
Mobile App Coming soon
Register Now!Product Road Map

Introduction
Introducing our robust and efficient ReservQ Laravel Script for an Online Food Delivery Order Management System, designed to streamline and enhance the entire process of managing food orders for your restaurant or food delivery business. This script leverages the power of Laravel, a renowned PHP framework, to deliver a seamless and scalable solution with the facilities of Laravel, Online Food Delivery, Order Management System, Real-time Tracking, ,Secure Payment Integration , Menu Management, Dashboard, Customer Profiles, Delivery Personnel, Notification System Reporting and Analytics, Multi-platform Compatibility, Customization Options.
Features
ReservQ has the following features.
Key Features
- Laravel 9 is used as PHP framework
- Bootstrap 5 is used in design
- User friendly codes and easy to navigate
- Eye-catching and fully responsive design
- Strong security of codes
- Coupon System
- Product variant wise price
- Product add-on features
- Delivery, Pick-up, In-restaurant order feature
- Address Book
- Search product by category, price or custom text
- Subscribe verify with email
- Google analytics
- Google reCaptcha
- Tawk live chat
- Multi Language(Frontend)
- ERROR Page
- Email Template Setting
- SEO Setting
- Blog management
Payment Methods
- Paypal
- Stripe
- Razorpay
- Flutterwave
- Mollie
- Paystack
- Instamojo
- Bank Payment
Admin Features
- 100% secure admin panel
- Product category create/edit/delete
- Product create/edit/delete
- Restaurant management
- Delivery order management
- Pick-up order management
- In-restaurant order management
- Product reviews management
- Coupon create/edit/delete
- Shipping rule create/edit/delete
- Payment gateway management
- Customer management
- SEO Settings
- SMTP server mail
- Email configuration and template setting
- Google Recaptcha option
- Google Analytic option
- Tawk Live Chat option
- General Setting management
- Logo, favicon, breadcrumb image change option
- Promotional banner management
- About Page management
- FAQ create/edit/delete
- Testimonial create/edit/delete
- Terms and Conditions, Privacy Policy Page management
- Language create/edit/delete
- Theme(Frontend) langauge translate option
- Subscriber manage
- Profile information, photo, password change option
- Blog Category create/edit/delete
- Blog create/edit/delete
- Manage Blog Comments
- Contact message management
- And more...
User/Customer Features
- 100% responsive design
- Language switcher
- User registration system with email verification
- User Login, forget and reset password option
- Profile information, photo, password change option
- Make Delivery order
- Make Pick-up order
- Make In-restaurant order
- Address Book
- Dashboard management
- Review management
- Wishlist management
Installation on Local Server
You will need to make sure your local server need the following requirements:
- Operating System: Windows, macOS, or Linux
- Web Server: XAMPP or WampServer ( You need to have one of them installed in your local PC/Computer)
- PHP: Version 8 or later
- Database: MySQL, PostgreSQL, SQLite, or other supported by Laravel
- Composer: PHP dependency manager
- Node.js and npm: For managing frontend assets
- Extensions: PHP extensions enabled - openssl, fil
Note: Make sure your local PC Fullfill all the REQUIREMENT or Installed in your computer.
Installing Laravel and Setting Up the Local Host
1. Download or clone your Laravel script from codecanyon on your local machine. The installation of this script is super easy. If you can install normal php based scripts on your local host, you can install our script. We will tell you how to install this script step by step on a localhost.
If you extract the zip file, you will see that there are total three folders.

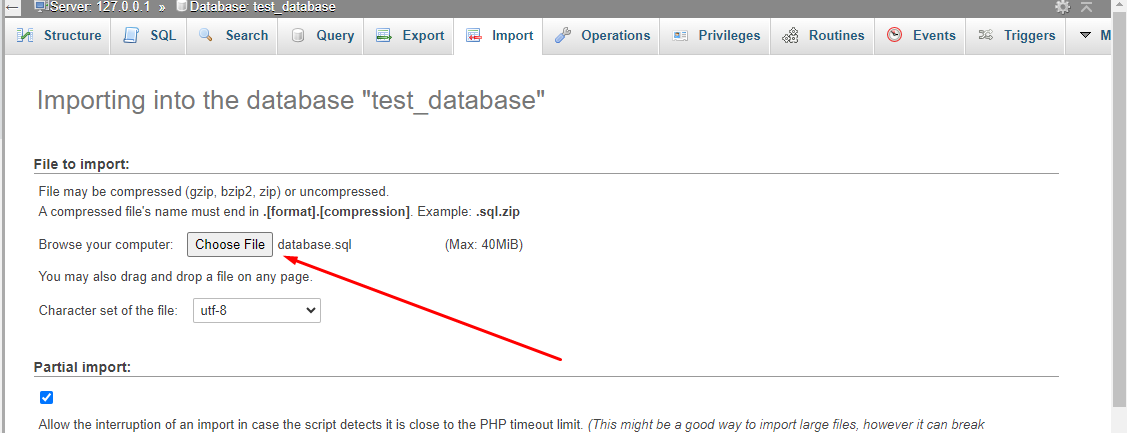
The folder names are: sql, documentation and main_files. The "main_files" folder is the main laravel source codes. The "sql" folder contains the main database file "database.sql"
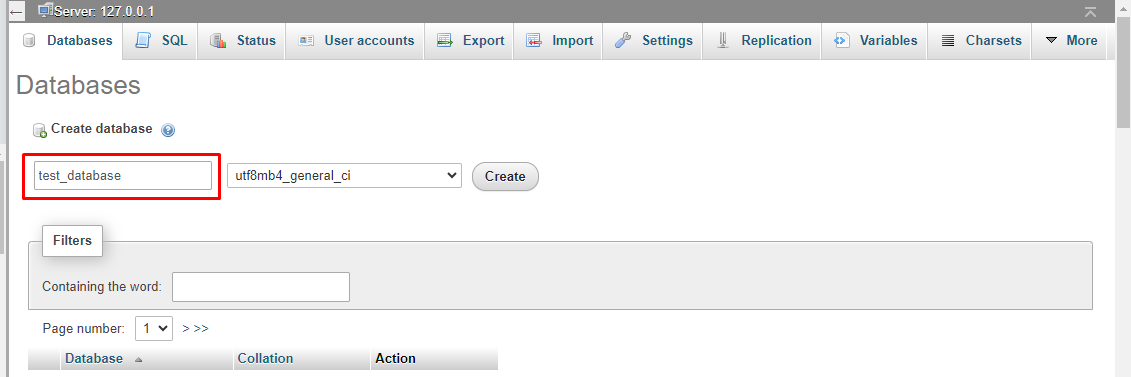
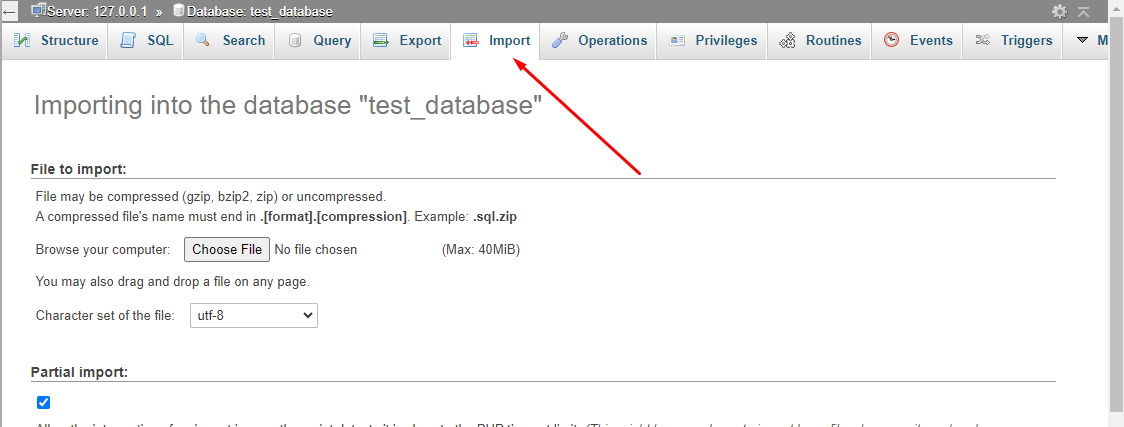
2. To create database on localhost go to your localhost phpmyadmin http://localhost/phpmyadmin/index.php and now click 'New'
Setup 1

Setup 2
Setup 3

Setup 4
Setup 5
Setup 6
3. After extracting the main zip go to the extract folder.

4. Inside the "mail_files" you can see 2folders (main_files, all_version). The "main_files" folder is the main laravel source codes. The "all_version" folder will be use for version update.

5. Now go to "xampp >> htdocs" and create new folder. Inside the folder paste your "main_files"(laravel source code) folder content.
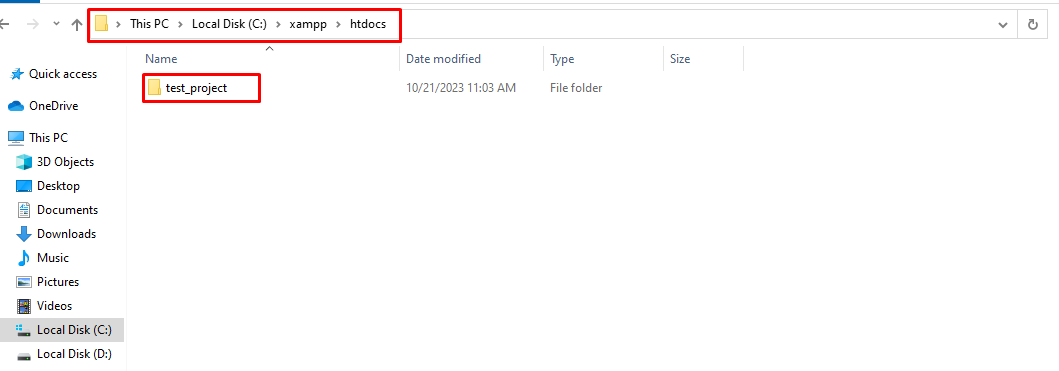
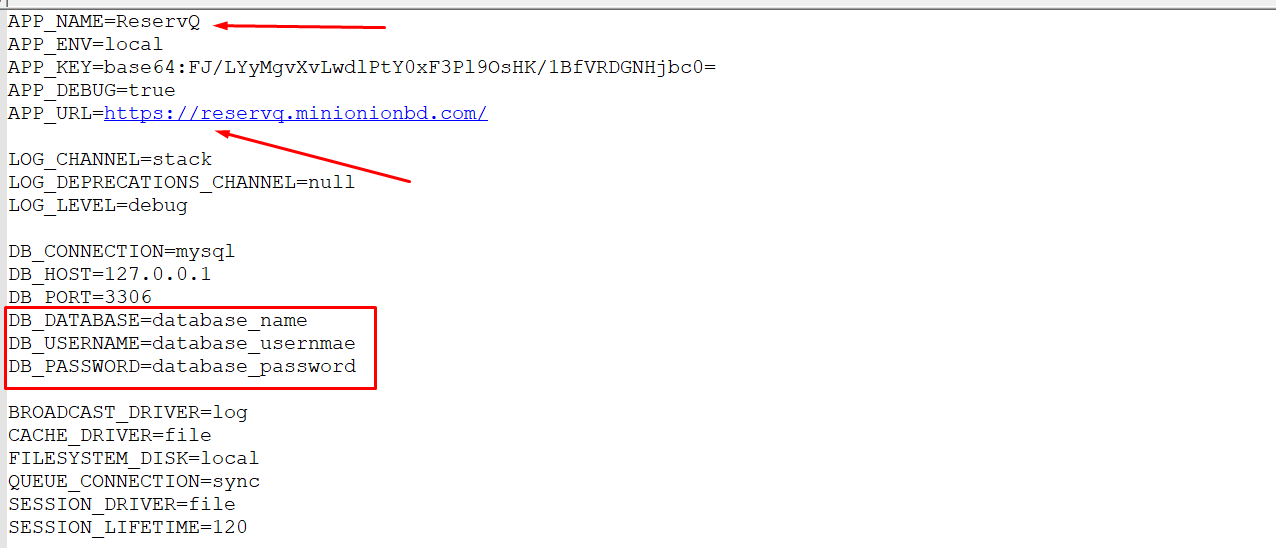
6. Now open the .env file and update with your database credentials, app_name, app_url as needed.

7. Now open your web browser and visit the local URL to access your Laravel application (by default, http://localhost).
Installation on Live server
The installation of this script is super easy. If you can install normal php based scripts on your server, you can install our script. We will tell you how to install this script step by step on a server.
If you extract the zip file, you will see that there are total three folders.

The folder names are: sql, documentation and main_files. The "main_files >> main_files" folder is the main laravel source codes. The "sql" folder contains the main database file "database.sql"
Creating Database using Cpanel
1. Login to your hosting's cpanel using the login information. You will see an interface like this:
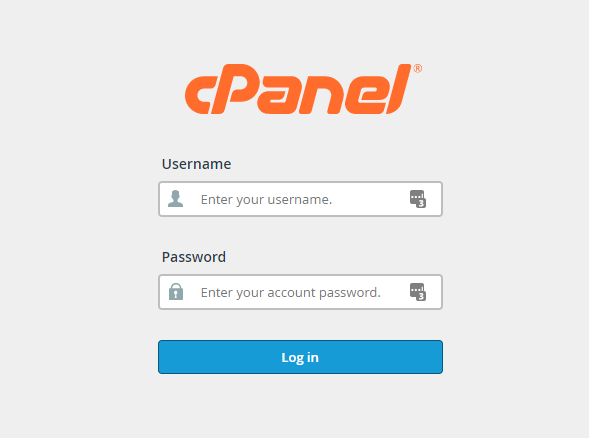
2. You will get a search section in the cpanel. Search there by writing the word "database". You will get some options. Click on "MySQL® Database Wizard" option.

3. Then in Step 1, you will have to create a database. In the text field, give your database name and click on next step.

4. Then in Step 2, you will have to create a database user. Give your username and passwords here. Then click on "Create User" button.
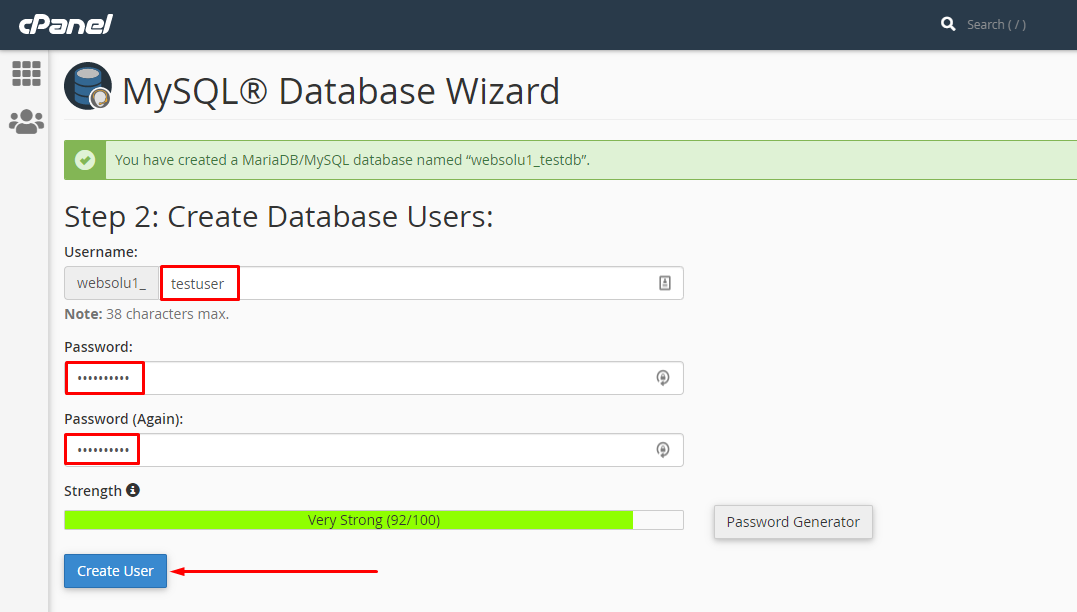
5. Now a permission page will come. Just check the tick mark on "ALL PRIVILEGES" and you will see all the options will be automatically checked.
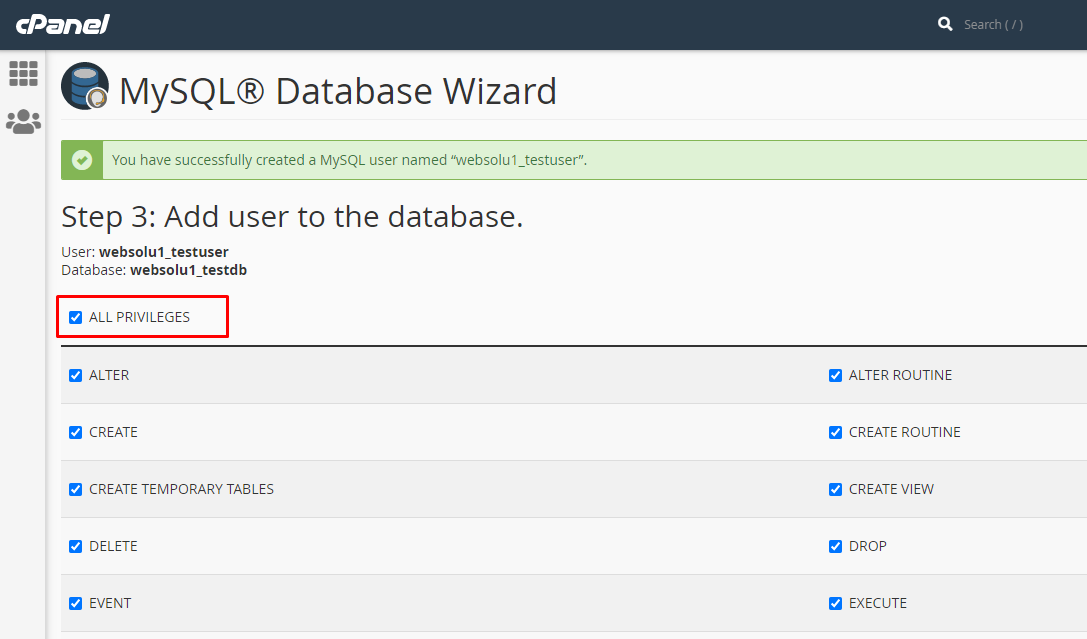
6. Click on the "Next Step" button in the bottom.

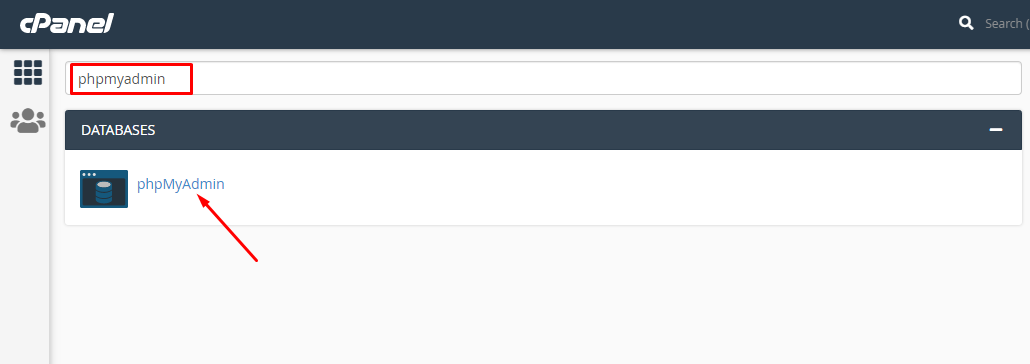
7. Database and user creation step is done. Now go back to home and again search like before with the word "phpmyadmin". Click on the "phpMyAdmin" option.
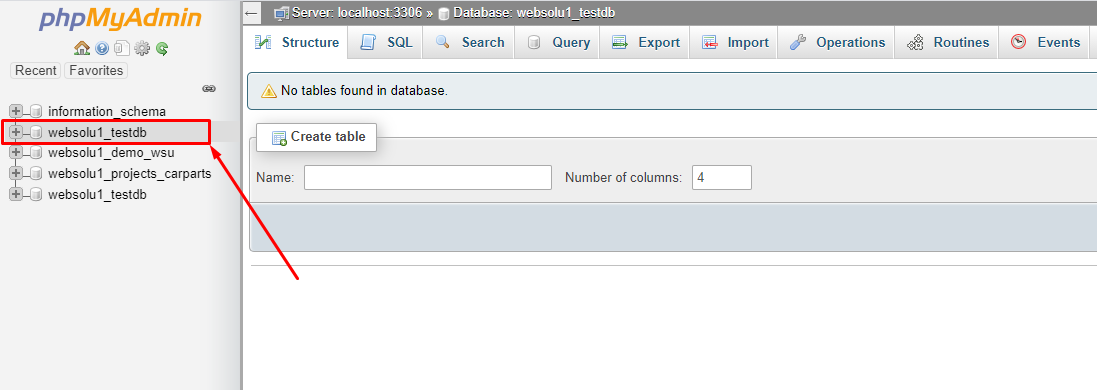
8. Now the main phpmyadmin page will come. Click on the newly created database "websolu1_testdb" from the left side.
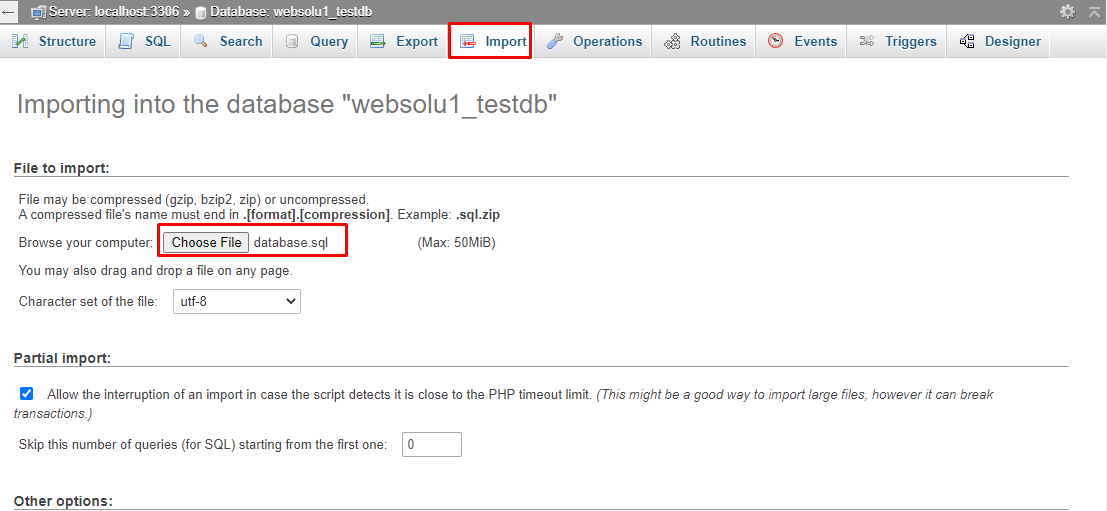
9. Click on the "Import" option from top and then select the file "database.sql" that is in the "sql" folder of the script.
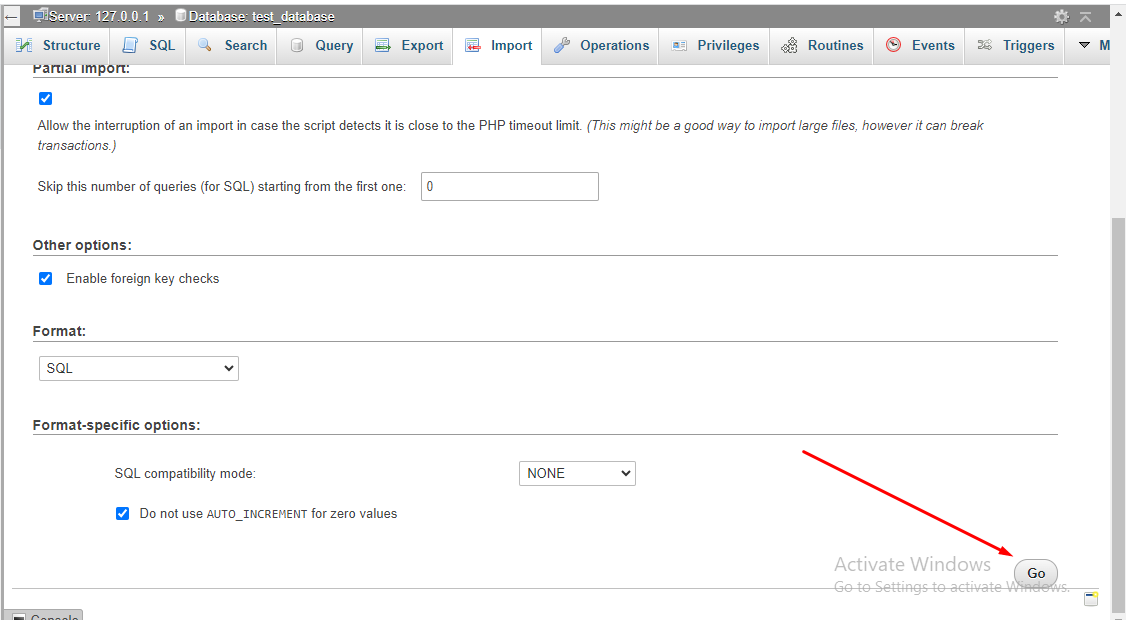
10. Then click on the "Go" button from bottom.
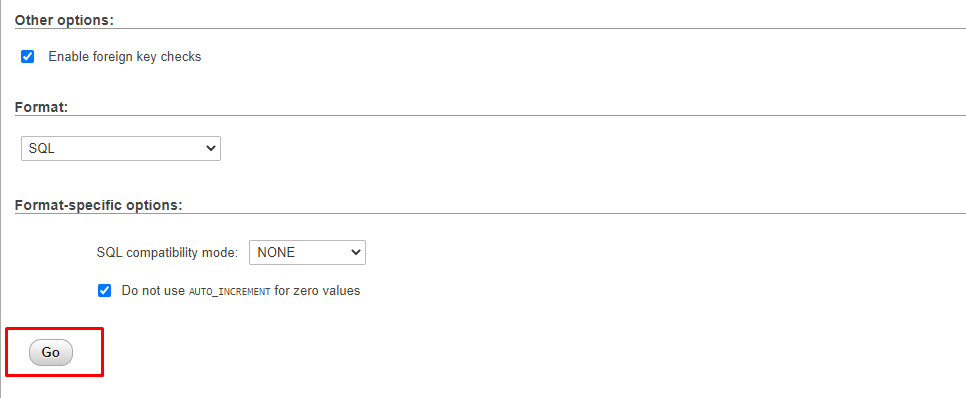
11. After the task is successful, you will get a success message.

12. All task related to database is done.
Uploading Files using Cpanel
1. In the search field of your cpanel, write the word "file". You will get a "File Manager" option. Click on that option.

2. Search for the "public_html" and go into there.
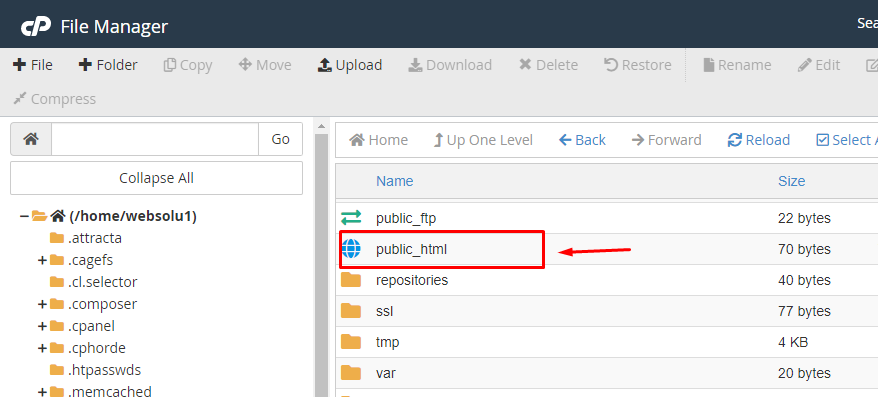
3. Now go to the folders that you got after extracting the main zip and compress the folder "main_files" using any software like winrar.


4. The zip file will be like this.

5. In the cpanel's "public_html", upload this zip file.
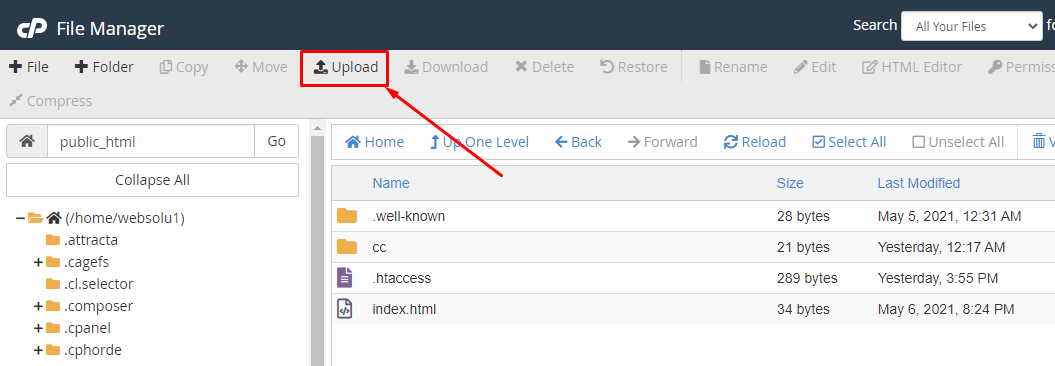
6. You will get an interface like this.
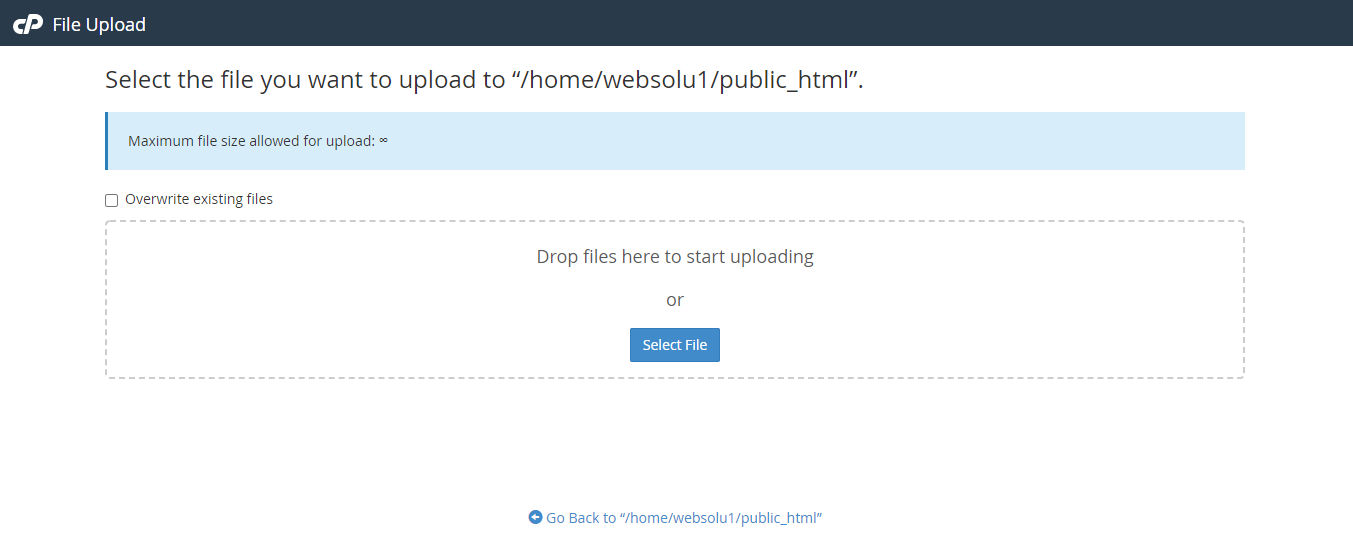
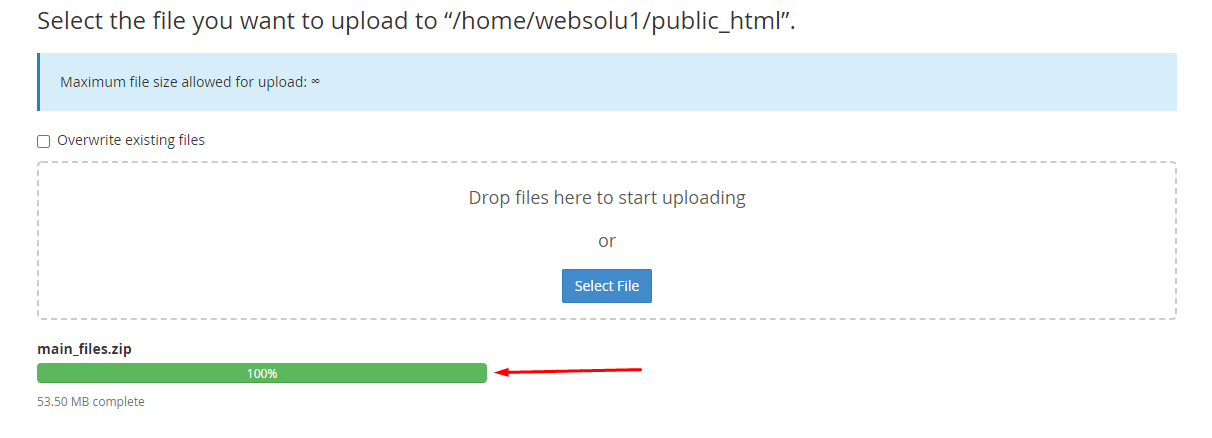
7. Drag and drop the zip file here or just click on the "Select File" and select the file from your computer. You will see a progress of uploading file. Wait until it is finished.
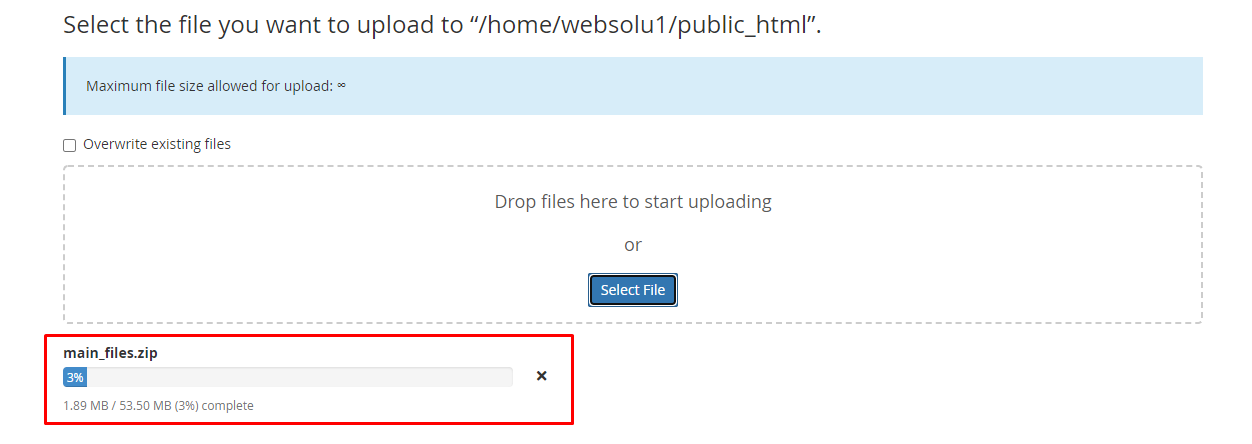
8. After finishing the upload, you will see a green bar. It indicates that upload is successful.
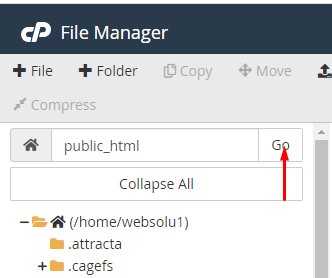
9. Now close the upload window. In the public_html section, press on "Go" button to refresh the page. Then you will see the zip file in the right side.
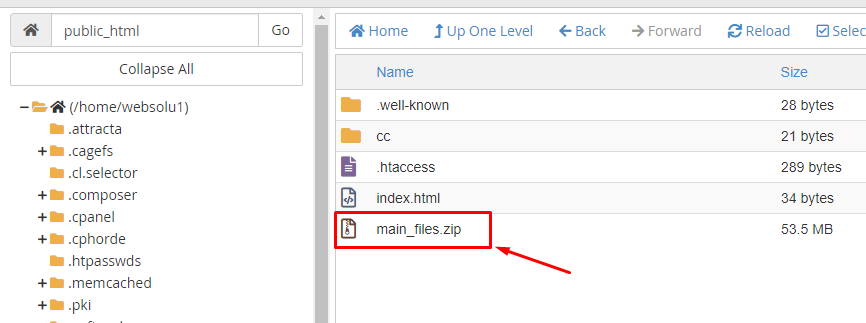
10. Do right click on that file and select "Extract" option.
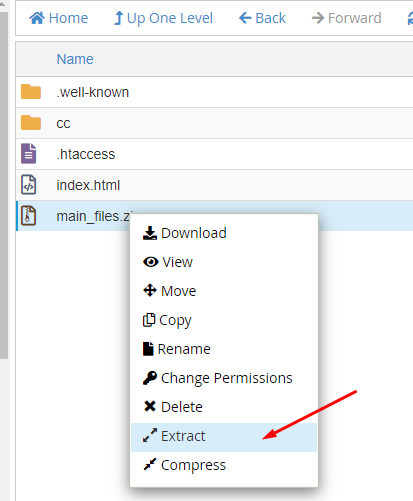
11. Press on "Extract Files" button.
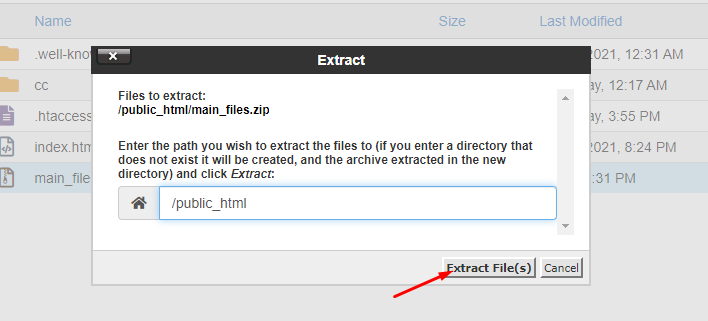
12. It will take only a few minutes. After finish, you will get a window like this.
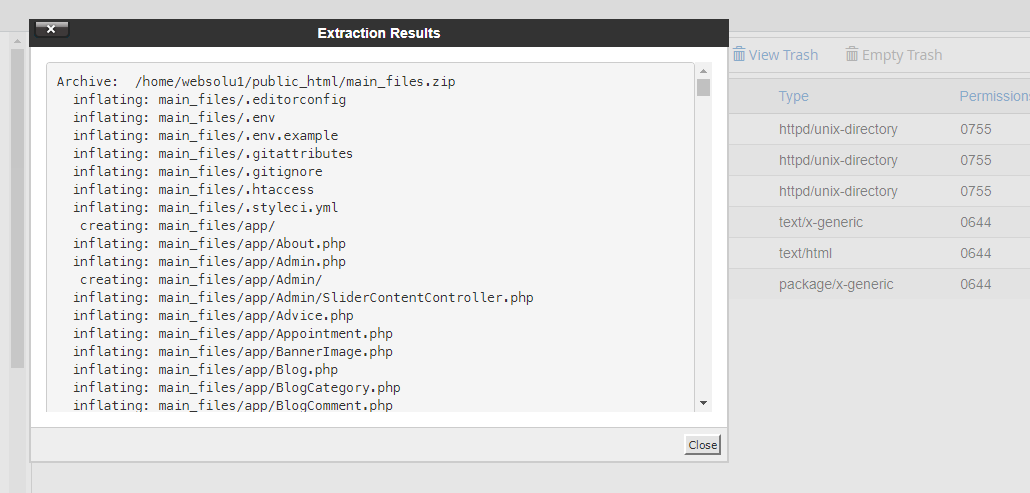
13. Just close this window. Then double click on the "main_files" folder and go into there.

14. Now click on the "Select All" from top section.
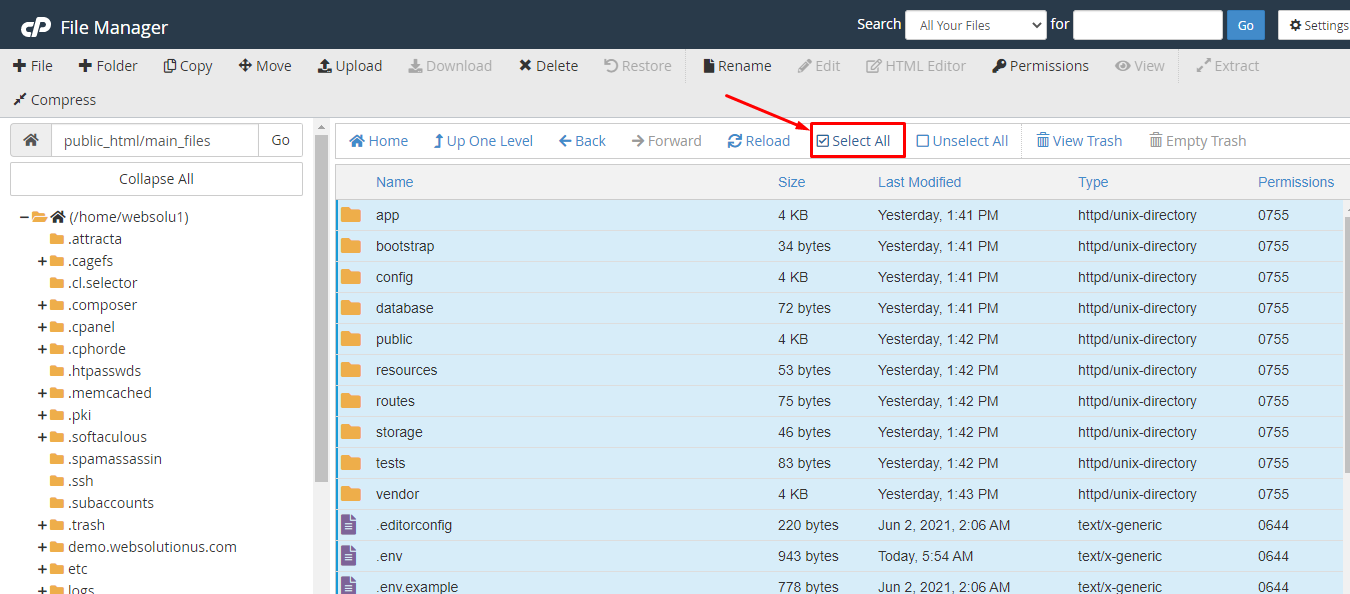
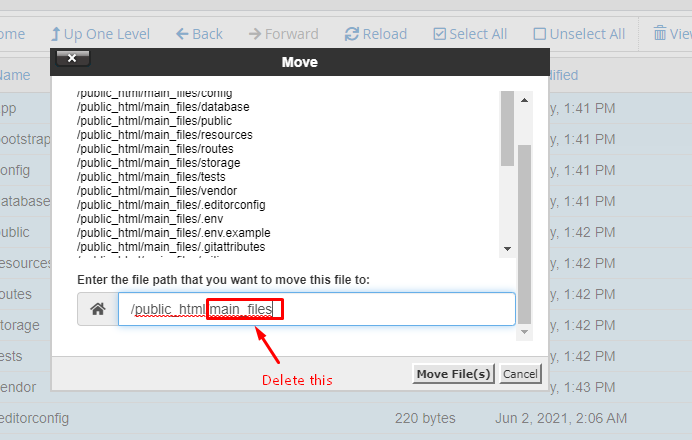
15. Click on the "Move" option.
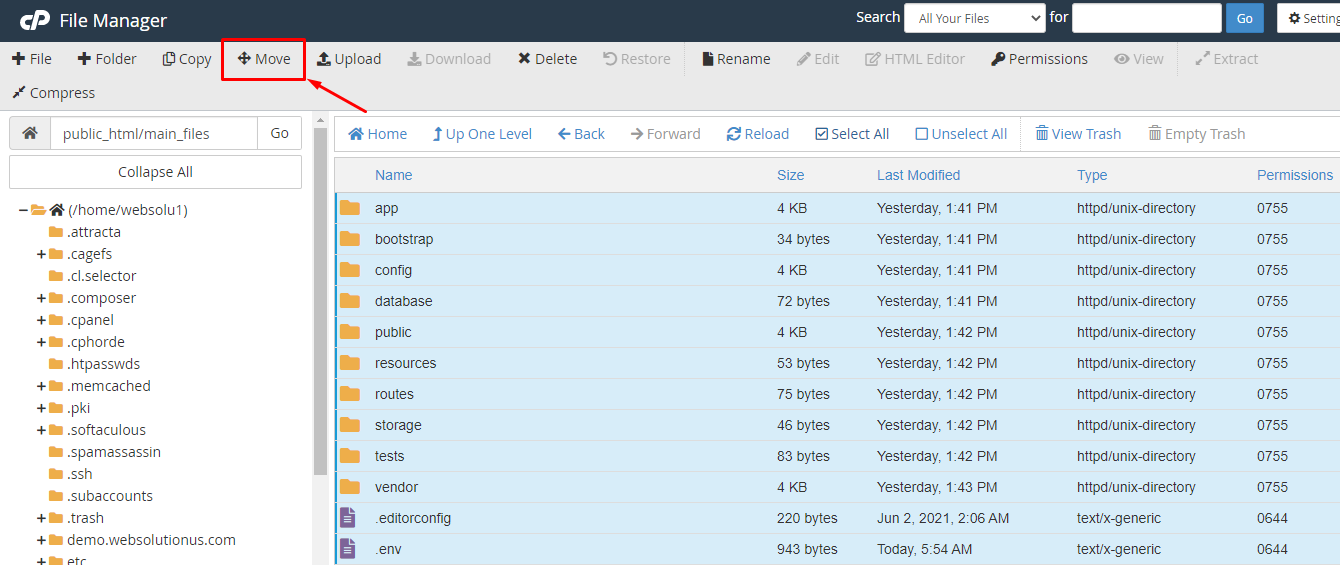
16. Delete the "main_files" from the box. Only keep this "/public_html/". Then click on "Move Files".
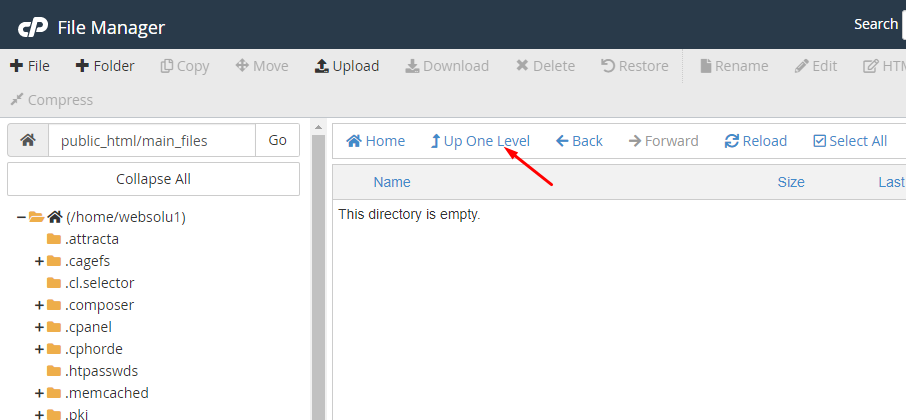
17. Now, click on "Up One Level".
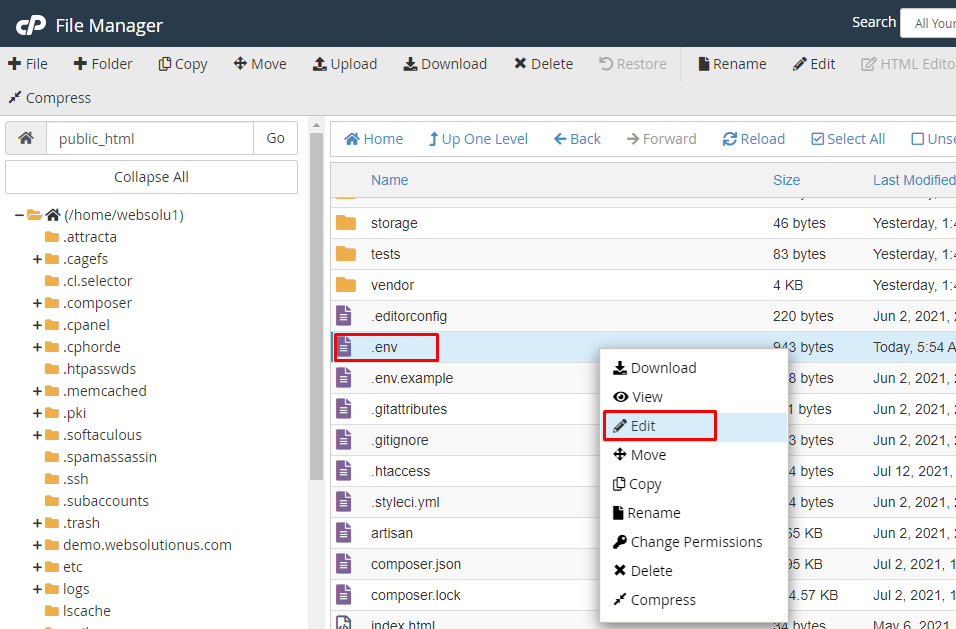
18. Right click on ".env" file and click on "Edit".
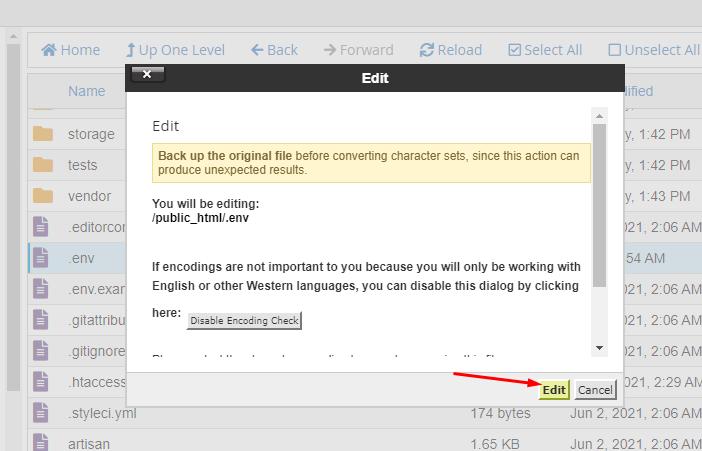
19. Now edit this file and put the database name, username and password you created previously here. Also put the app_url, app_name here. Then click on the "Save Changes" button.
Your task is done and you can use our script without any problem. :)
Configuration
Before using and run this script, you must have to change the following information.
1. Open the .env file with a text editor and change the database settings
2. First, set up the APP_NAME, APP_URL, database name, database_username and password.

Requirements
You will need to make sure your server meets the following requirements:
- PHP >= 8.1
- BCMath PHP Extension
- Ctype PHP Extension
- Fileinfo PHP extension
- JSON PHP Extension
- Mbstring PHP Extension
- OpenSSL PHP Extension
- PDO PHP Extension
- Tokenizer PHP Extension
- XML PHP Extension
Credentials
The default credentials of the script are:
Admin Login
Admin Dashboard
Login Email: admin@gmail.com
Login Password: 1234
User/Customer Login
User Profile
Login Email: user@gmail.com
Login Password: 1234
Theme Select
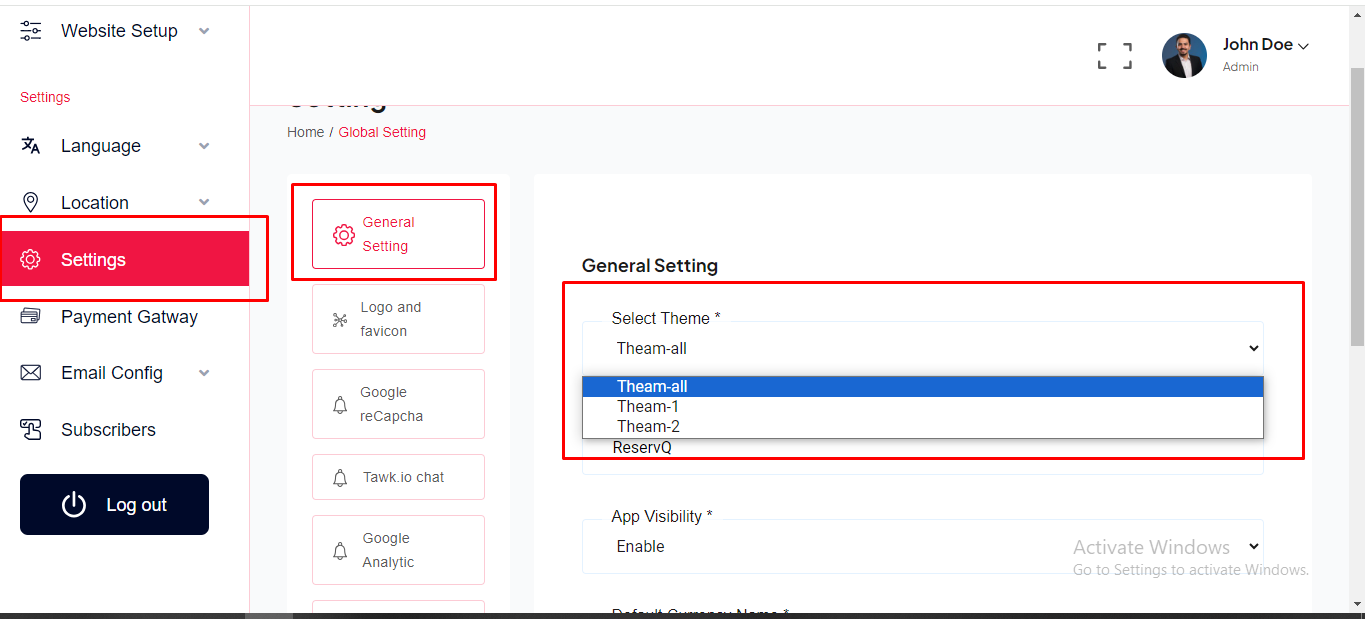
For the beginning , Admin need to select a theme. Go to "Setting >> General Setting". See:
General Settings
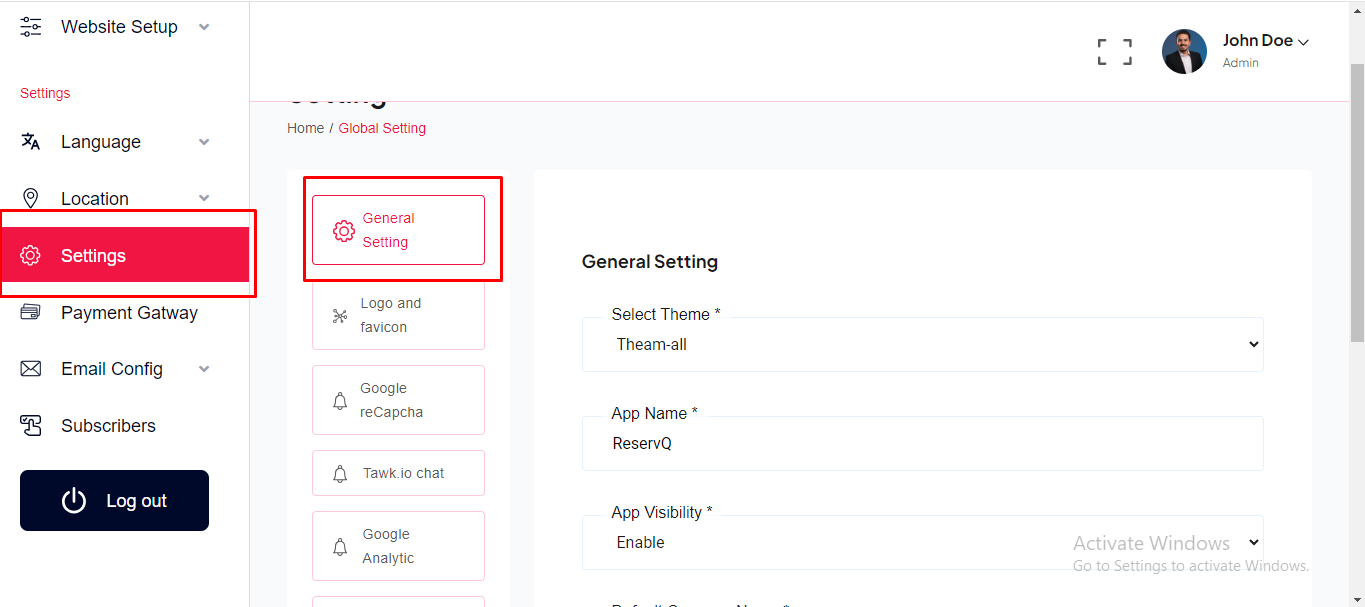
Website General Setting can be set up from the admin panel. In this section admin can be change App Name, Default Currency, Timezone, Currency Icon etc. Go to "Setting >> General Setting". See:
Logo and Favicon
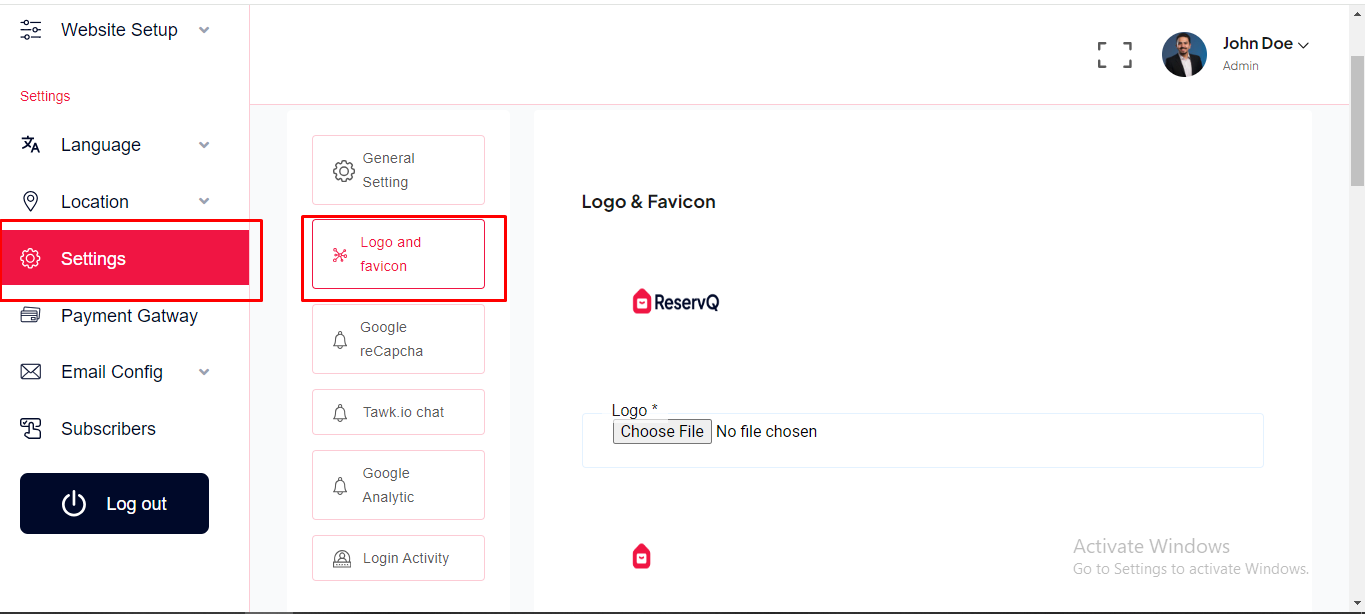
Logo and favicon can be set up from the admin panel. Go to "Setting >> Logo & Favicon" from the sidebar. See:
Google Recaptcha
Google Recaptcha can be set up from the admin panel. Go to "Setting >> Google Recaptcha" from the sidebar. See:
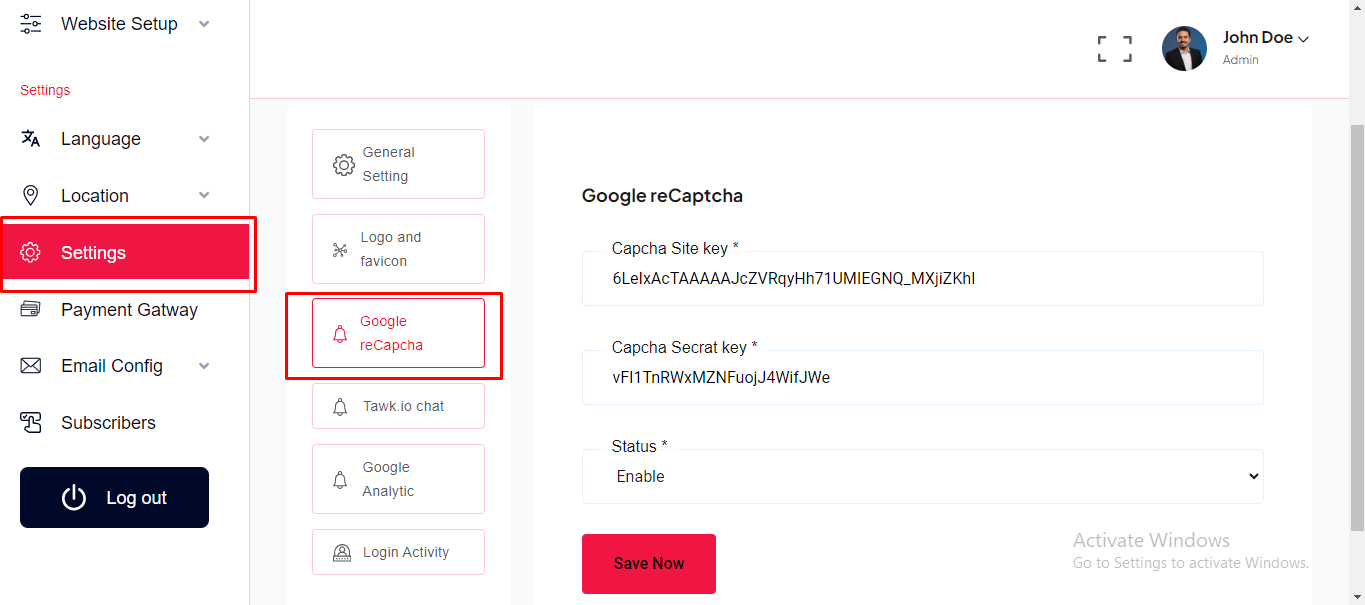
To get your recaptcha keys, go to this link:
https://www.google.com/recaptcha/admin/create
Select version 2.
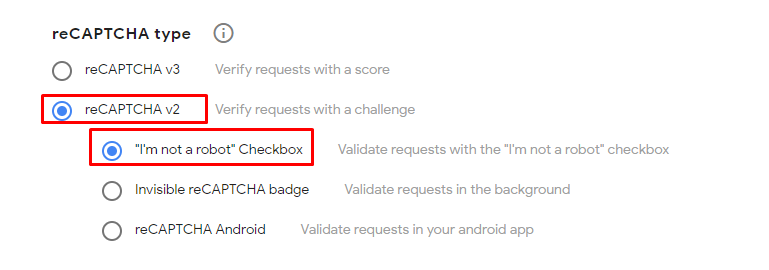
Add your website's domain name or subdomain name here and after submit you will get a site key and secret key.
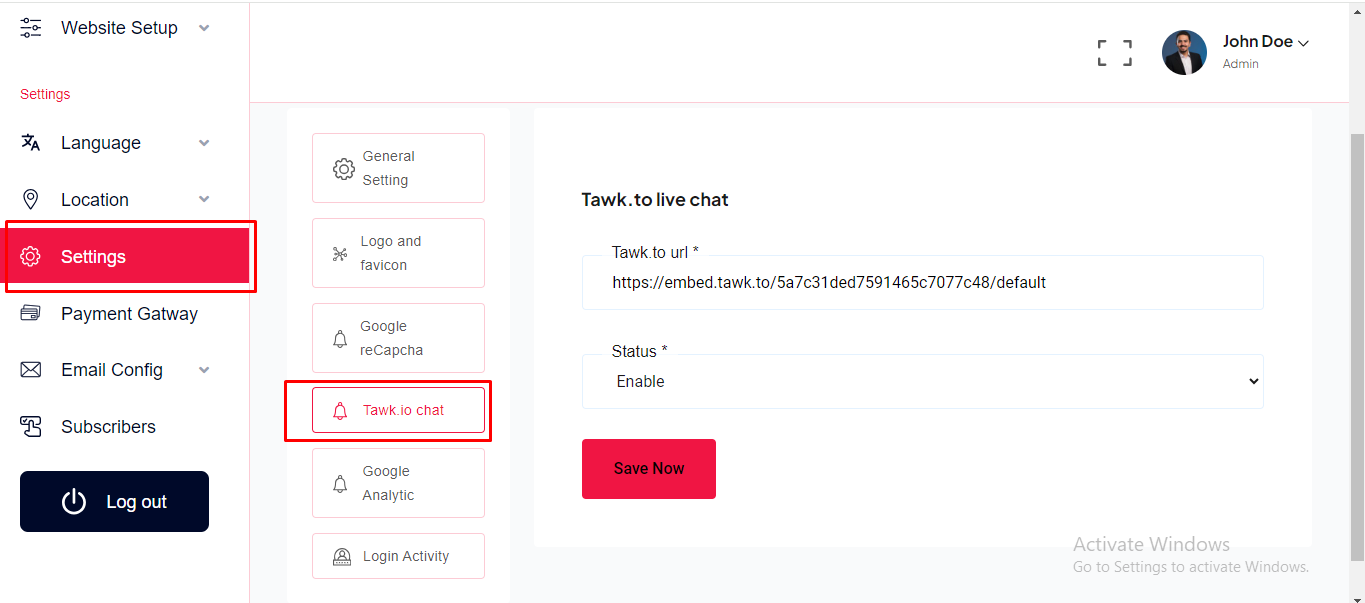
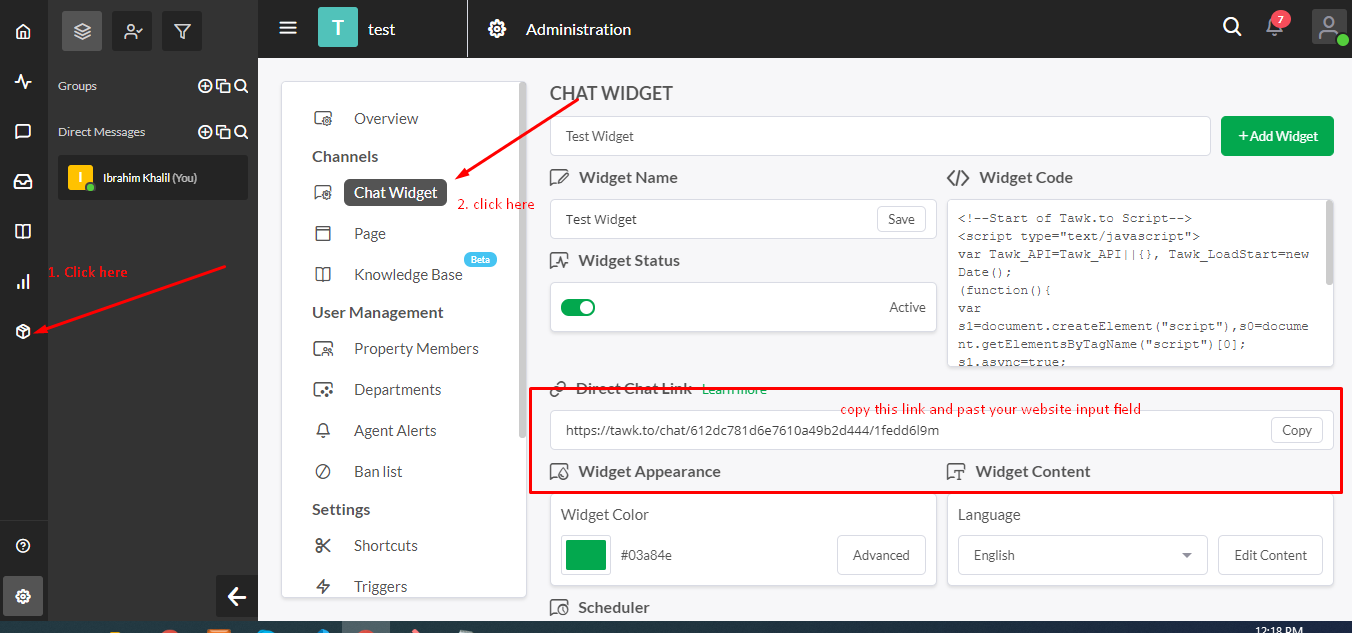
Tawk Live Chat
Tawk Live Chat can be set up from the admin panel. Admin can be enable and disable live chat option. Go to "Setting >> Tawk.io Chat" from sidebar. See:
Google Analytic Settings
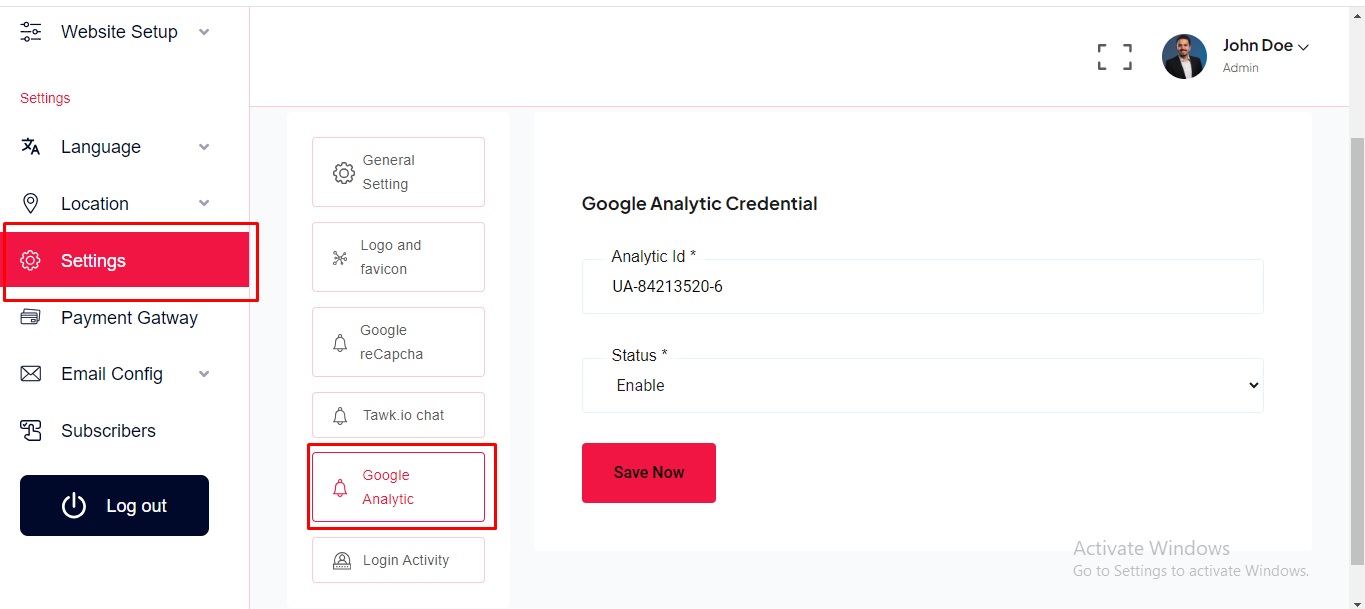
Google Analytic can be set up from the admin panel. Go to "Setting >> Google Analytic" from sidebar. See:
Email Setup
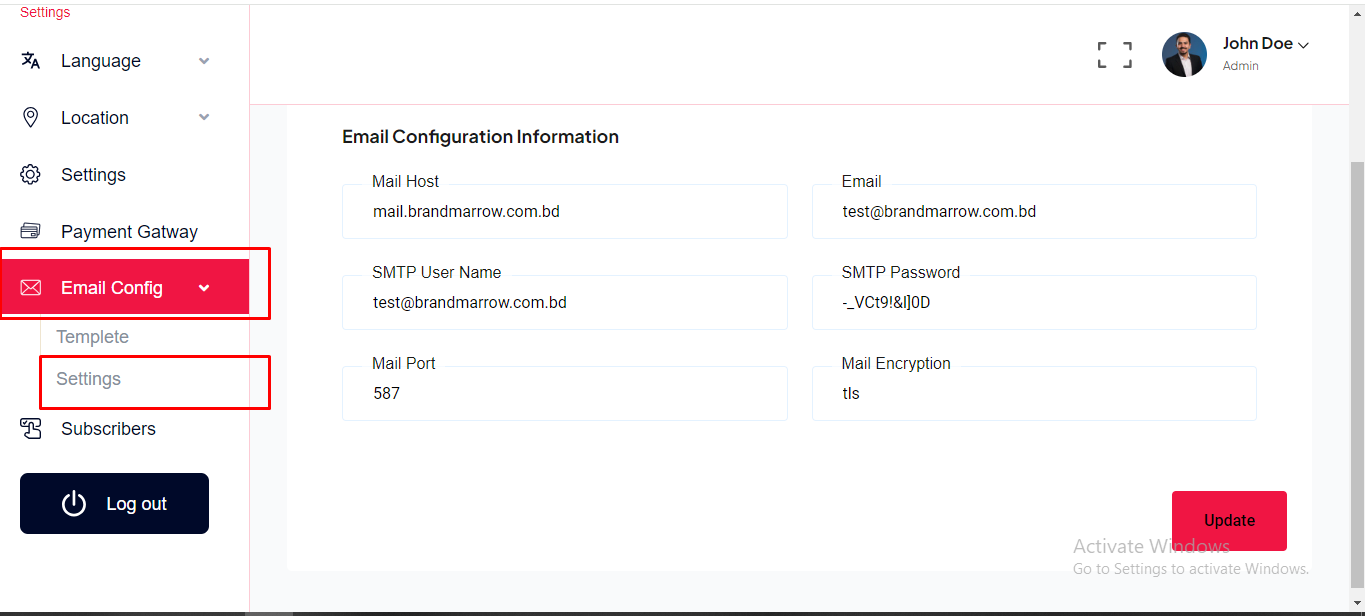
SMTP Email can be set up from the admin panel. Go to "Emai config >> Setting". See:
Email template
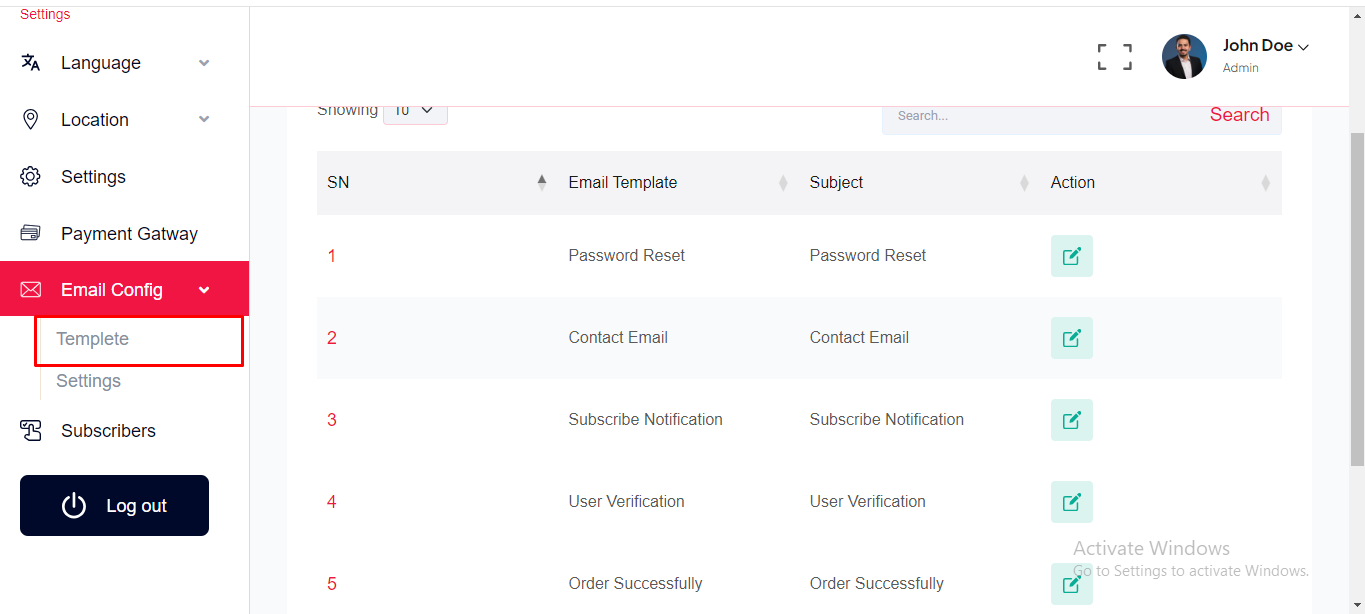
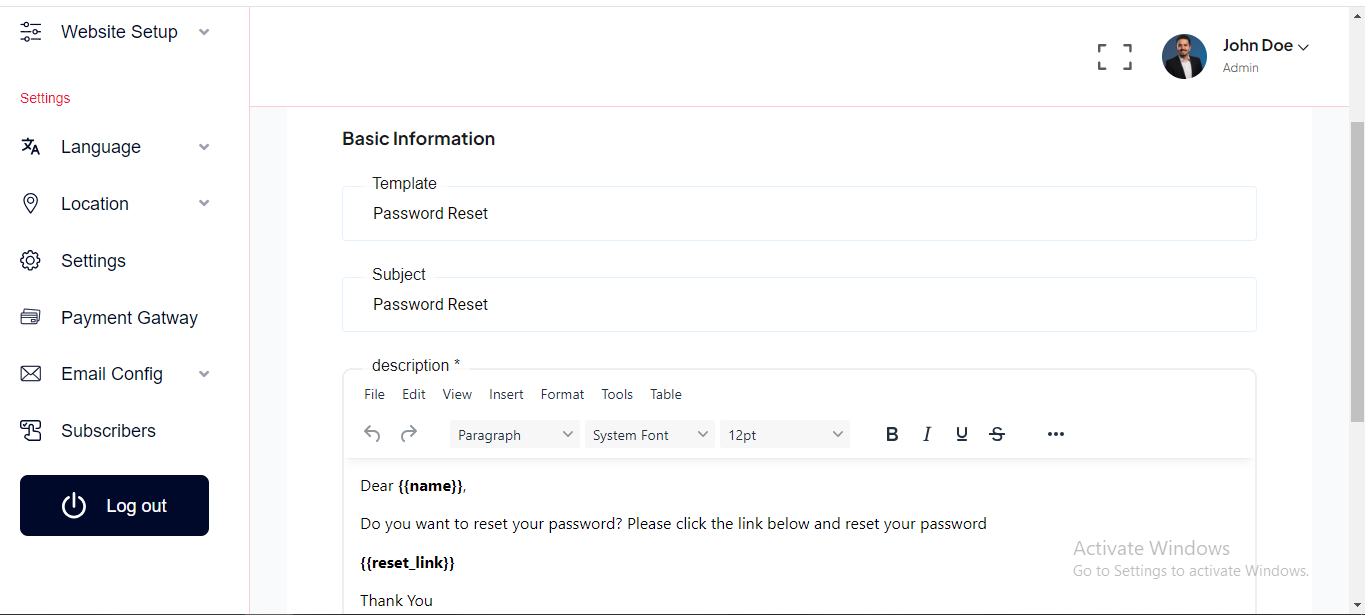
Email template can be set up from the admin panel. Go to "Emai config >> template". See:
Payment Gateway
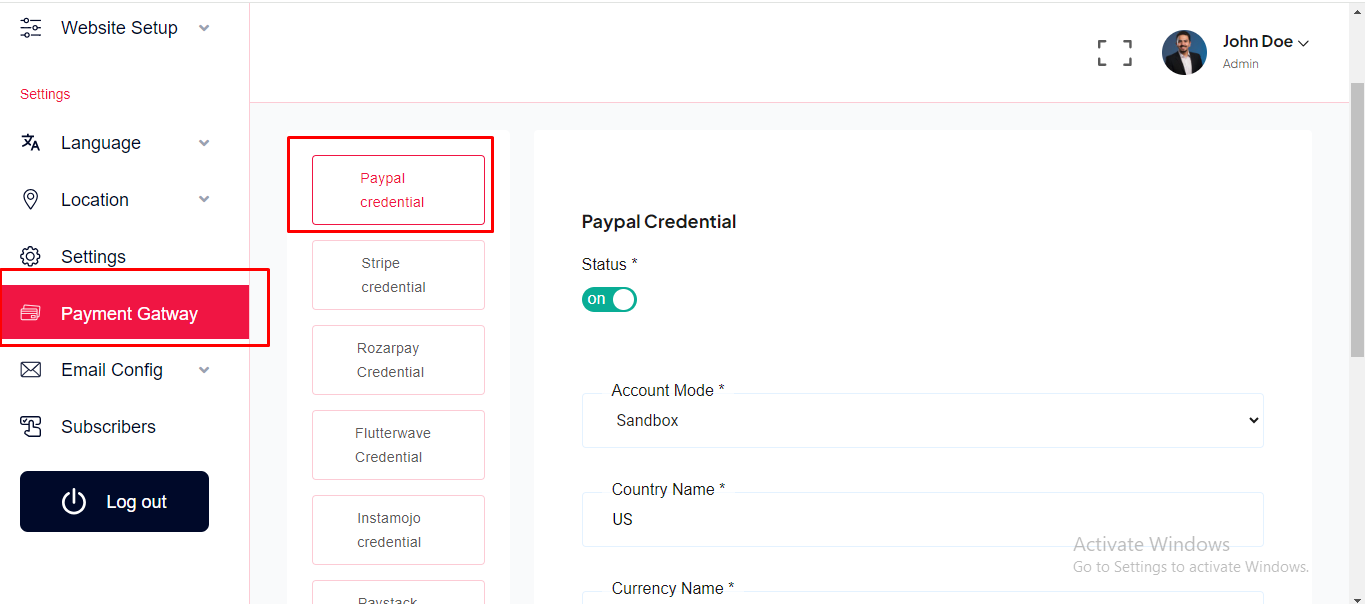
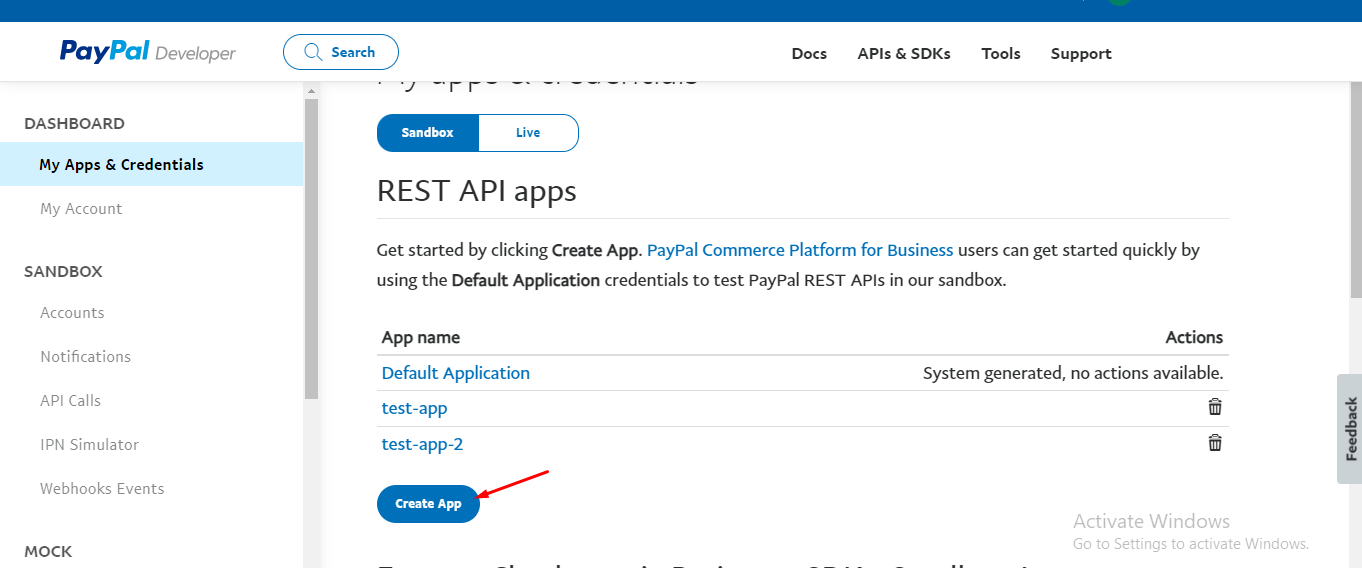
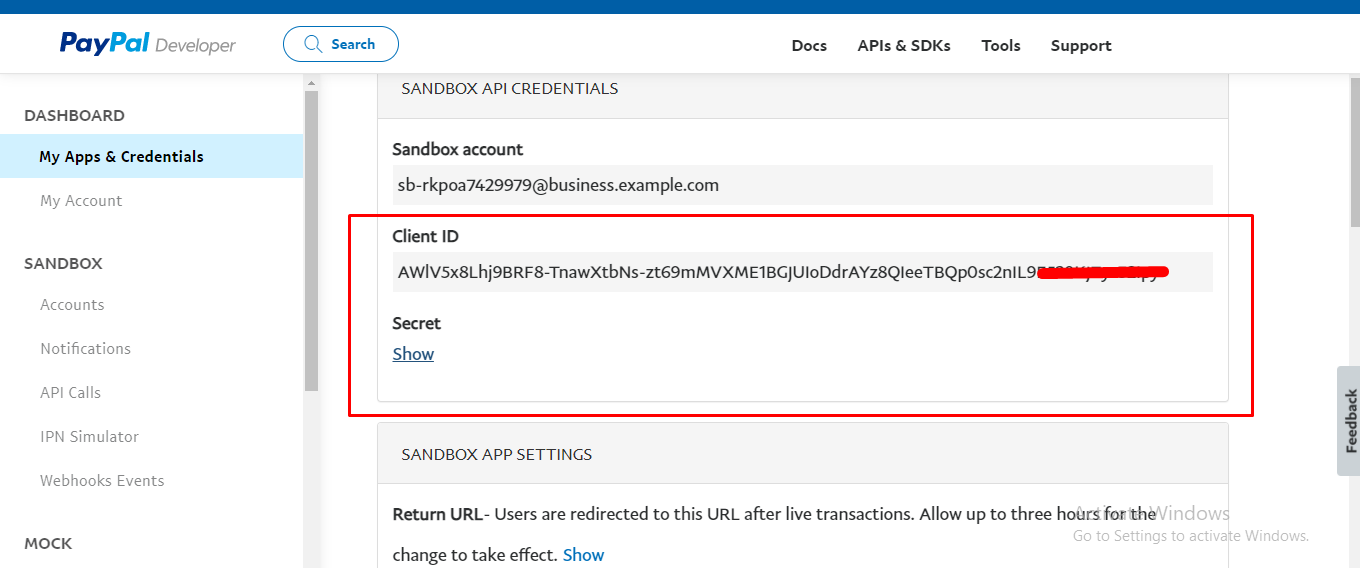
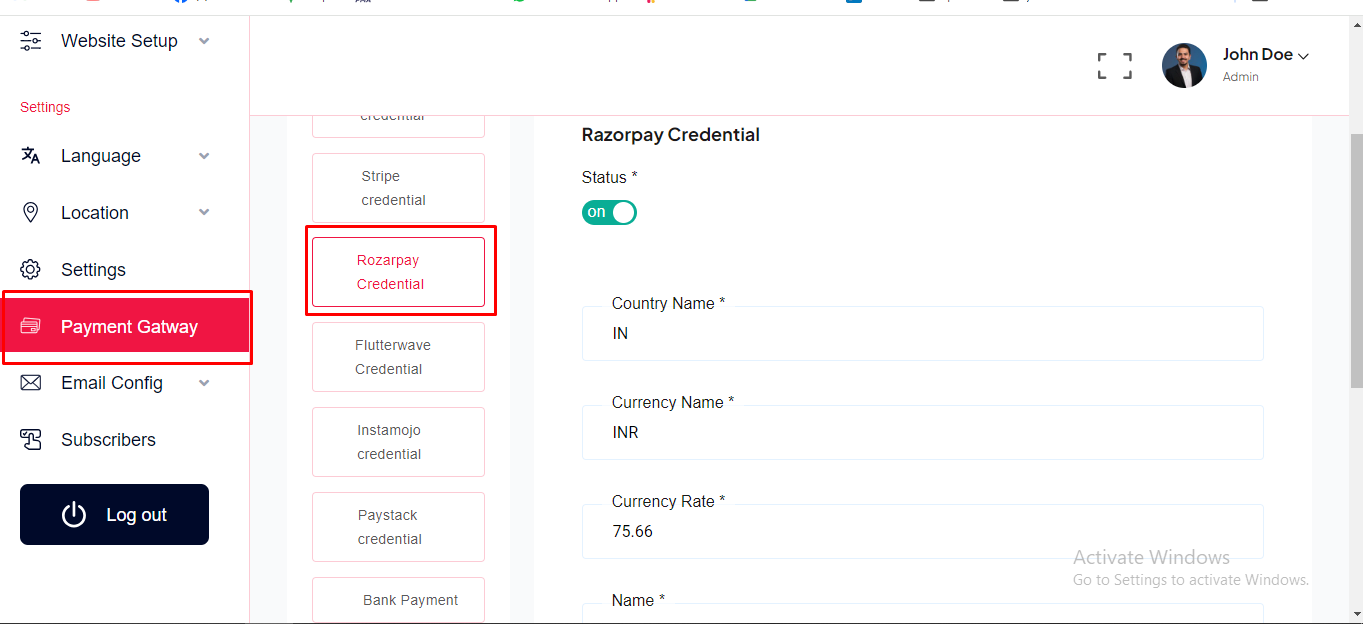
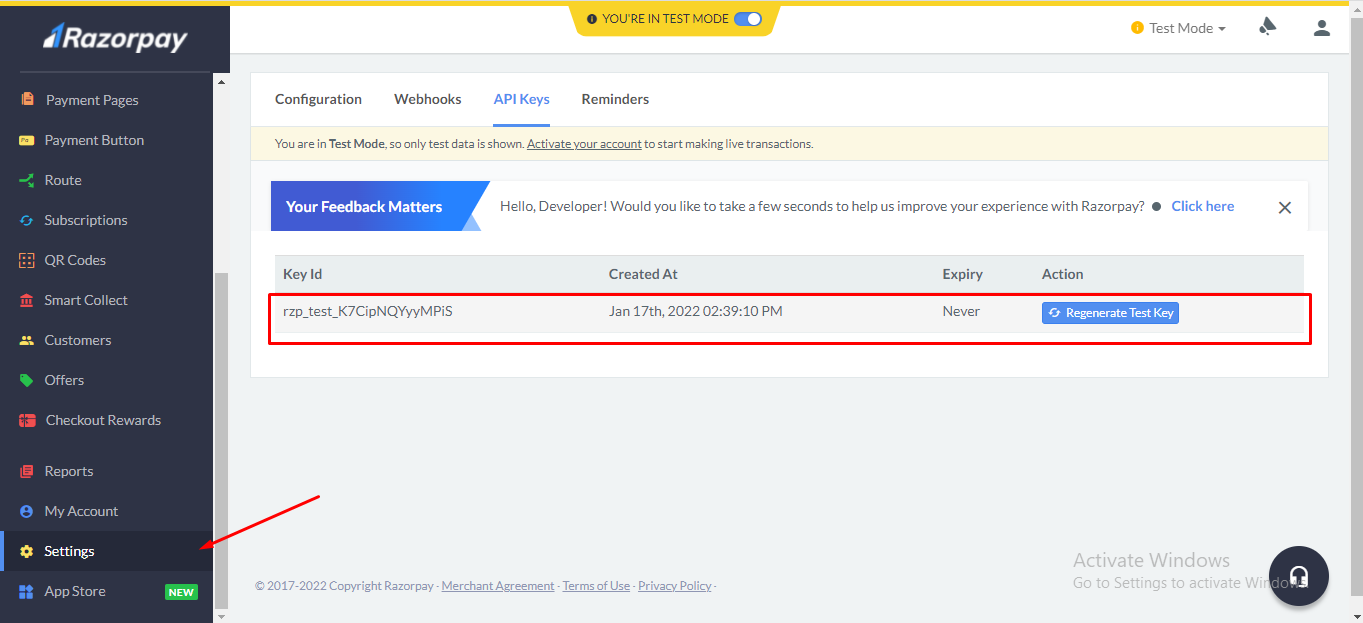
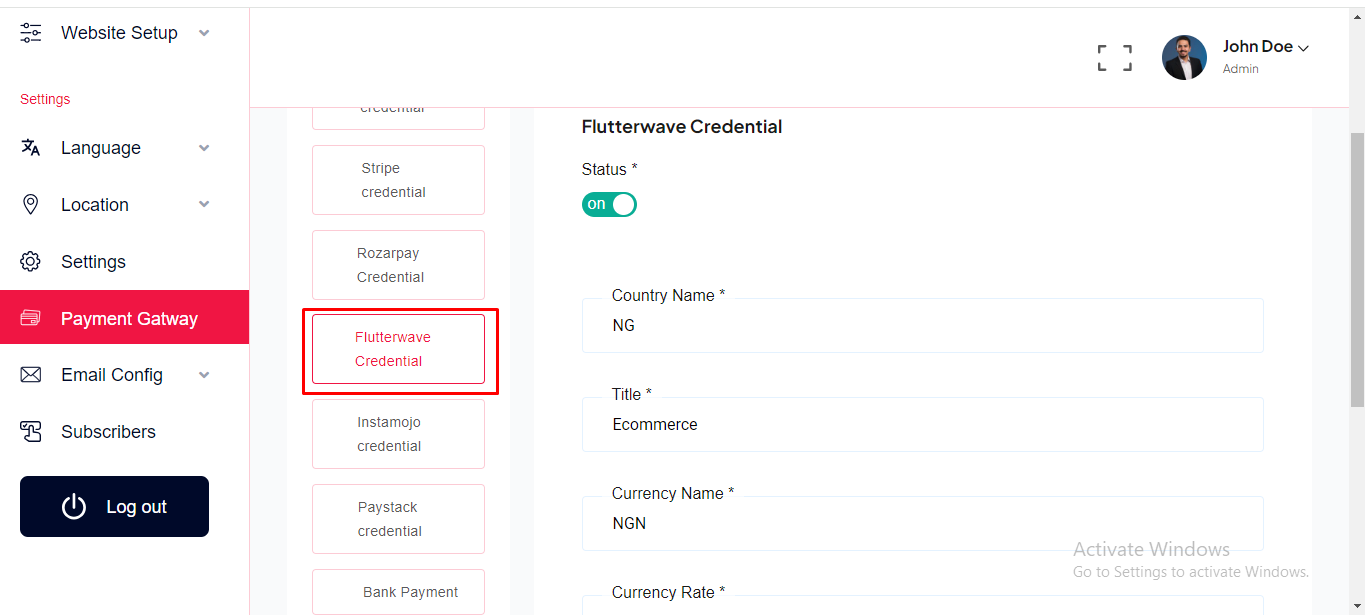
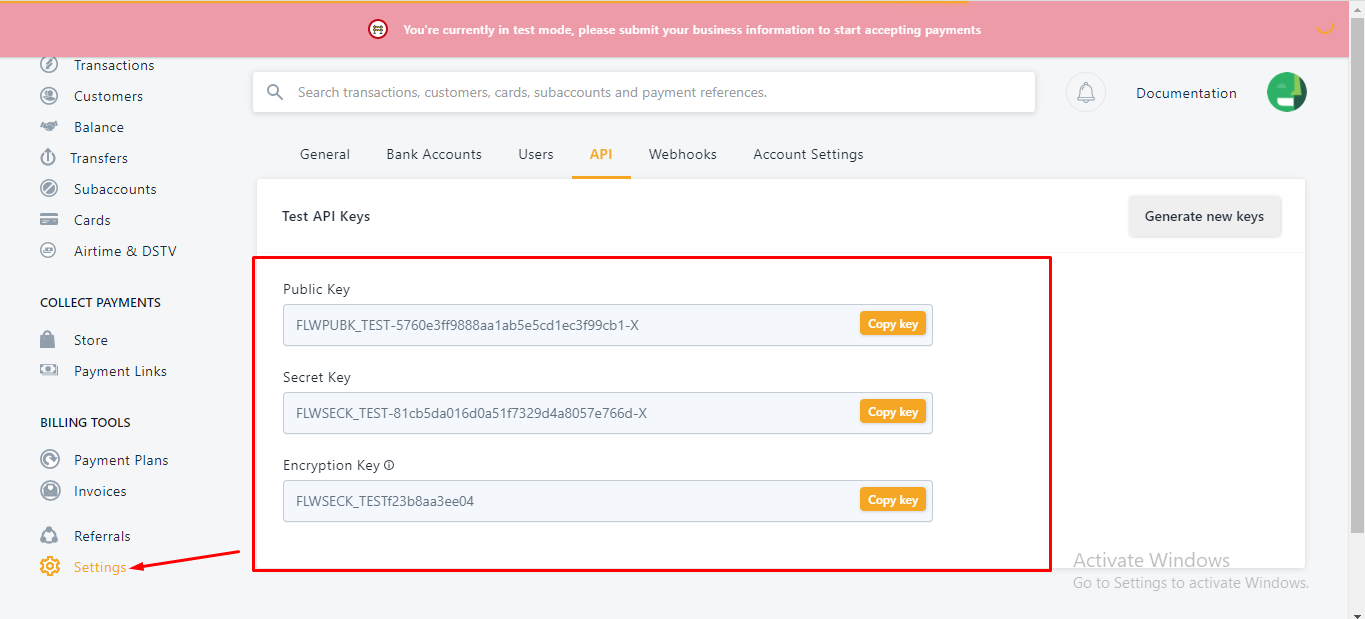
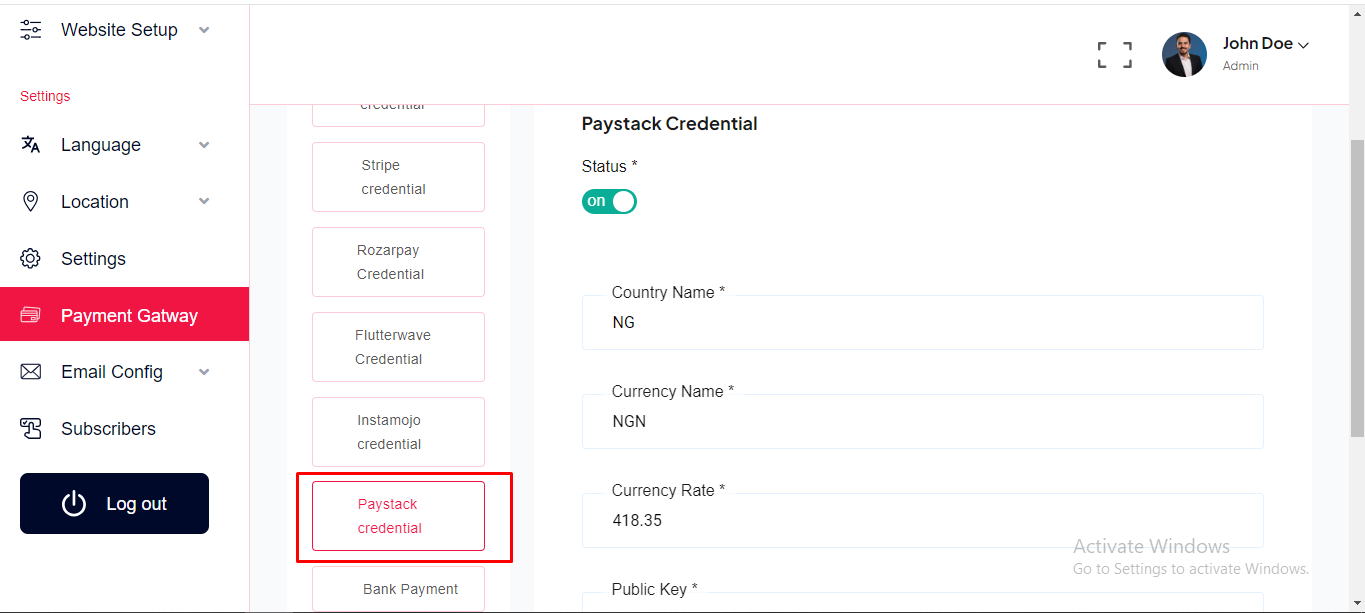
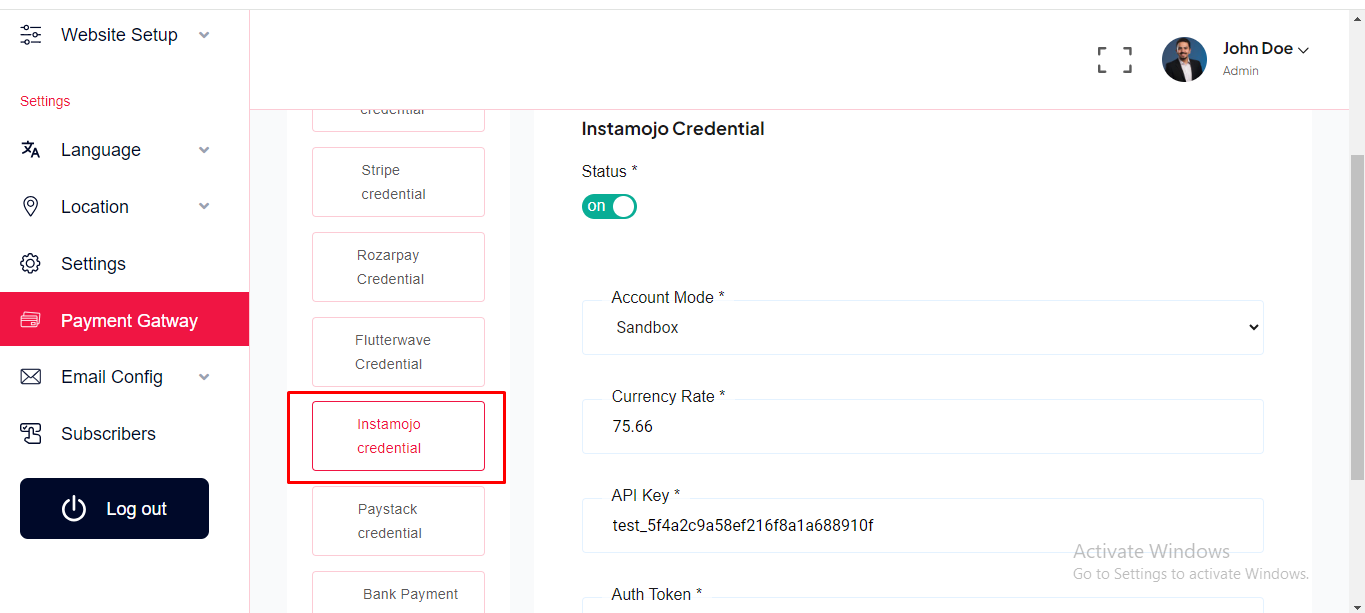
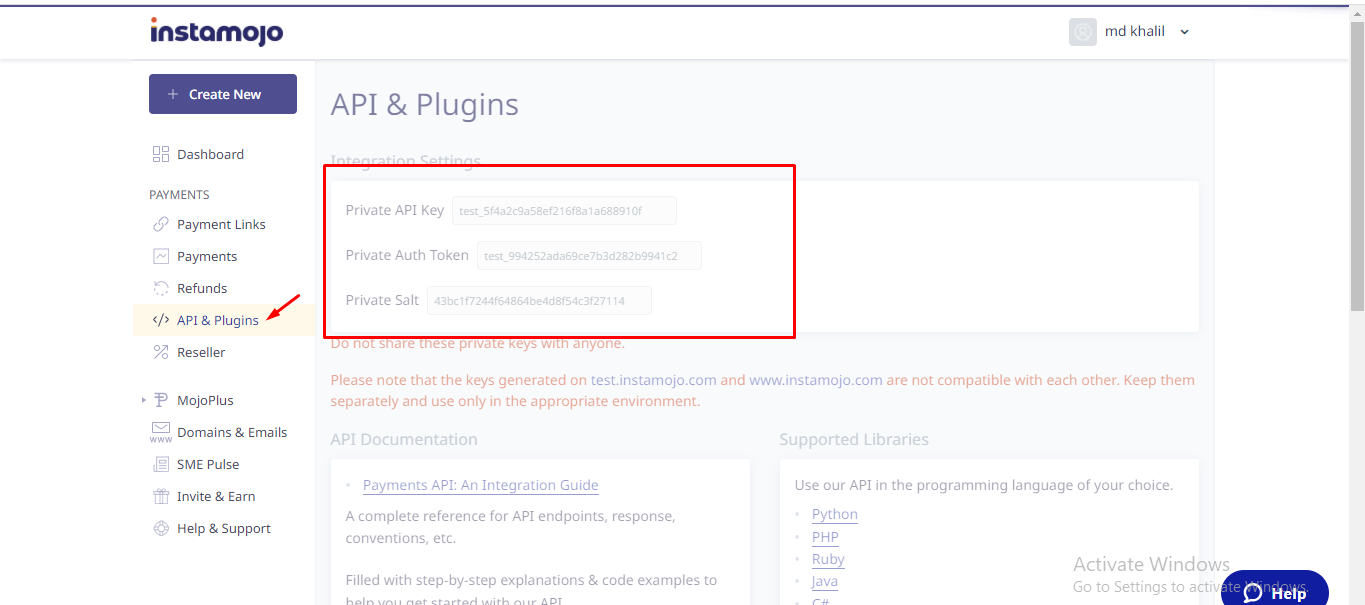
Payment Method can be set up from the admin panel. Go to "Payment Gateway" from sidebar. See:
Website Language
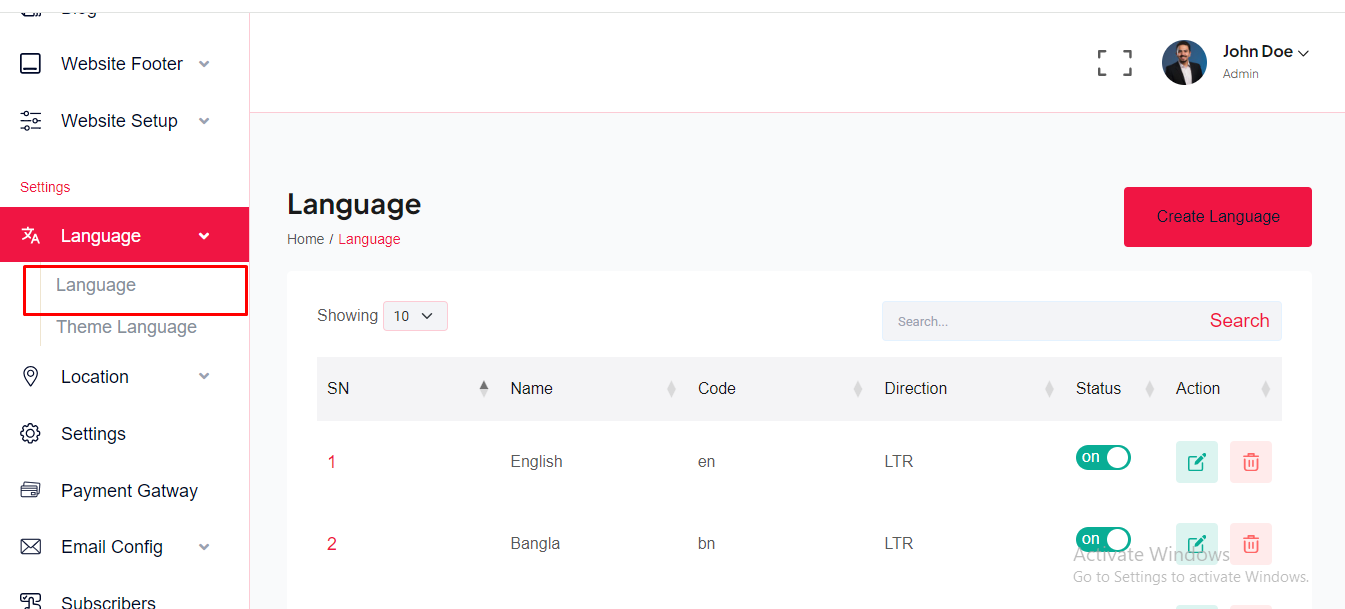
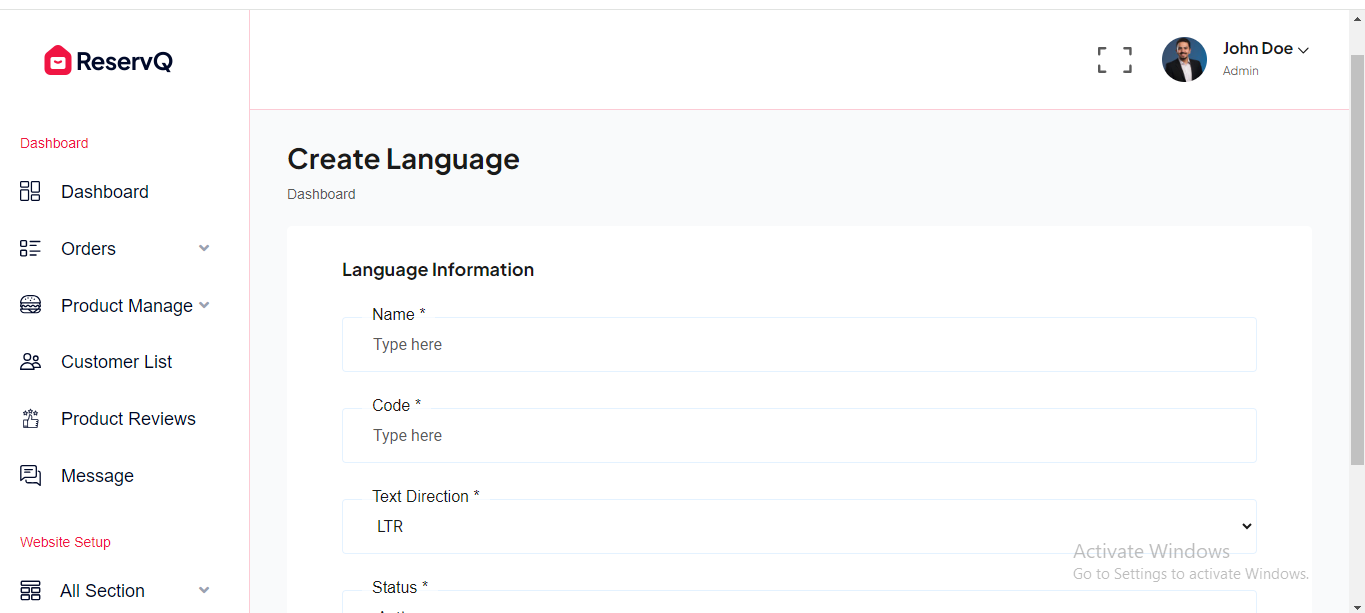
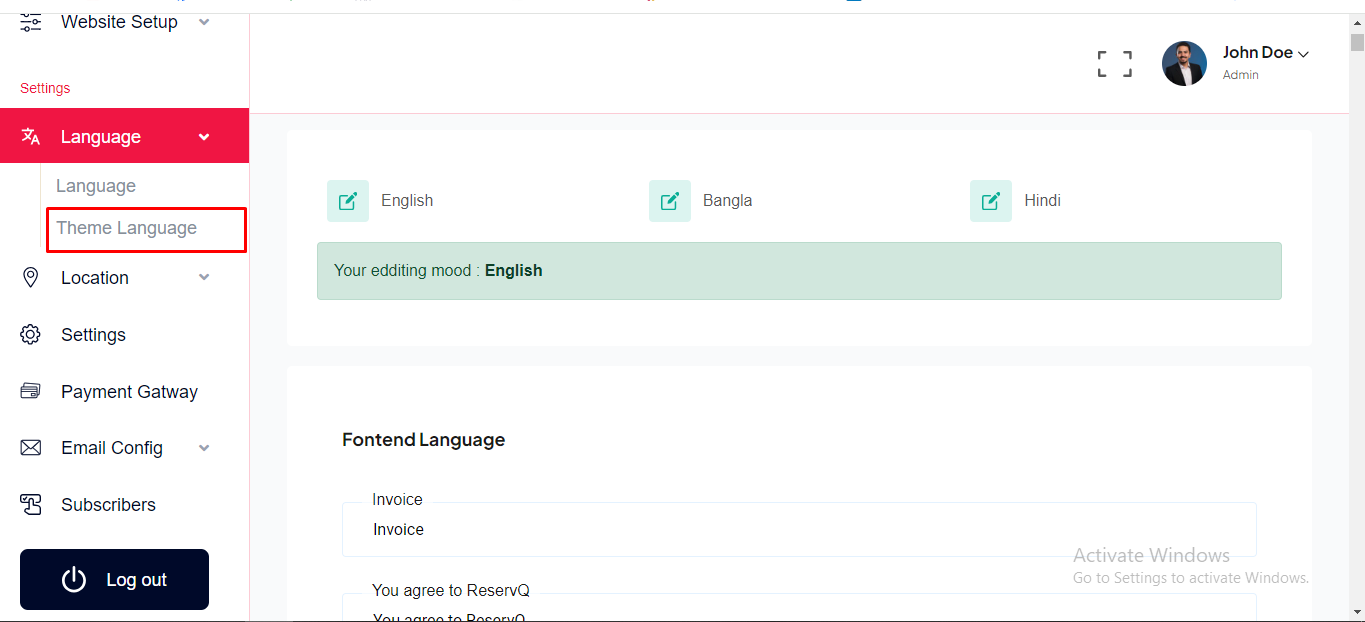
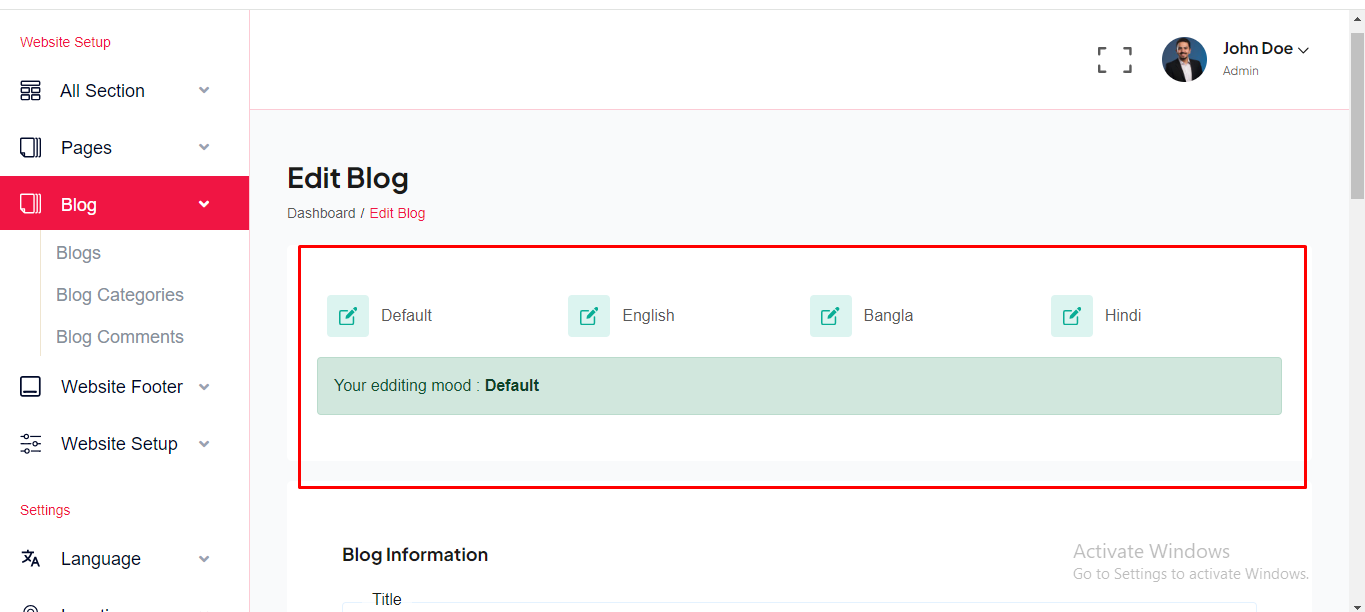
In our system, we offer an unlimited multi-language feature. The administrator has the ability to create an unlimited number of languages and can translate everything word by word. When the administrator creates something new, we store all the information as the default language in the database. Simultaneously, we also assign similar content for other languages during the creation of something new. On the edit page, the administrator can translate the content language-wise. For create a new language go to "Language >> Language" from sidebar. See:
Website Footer
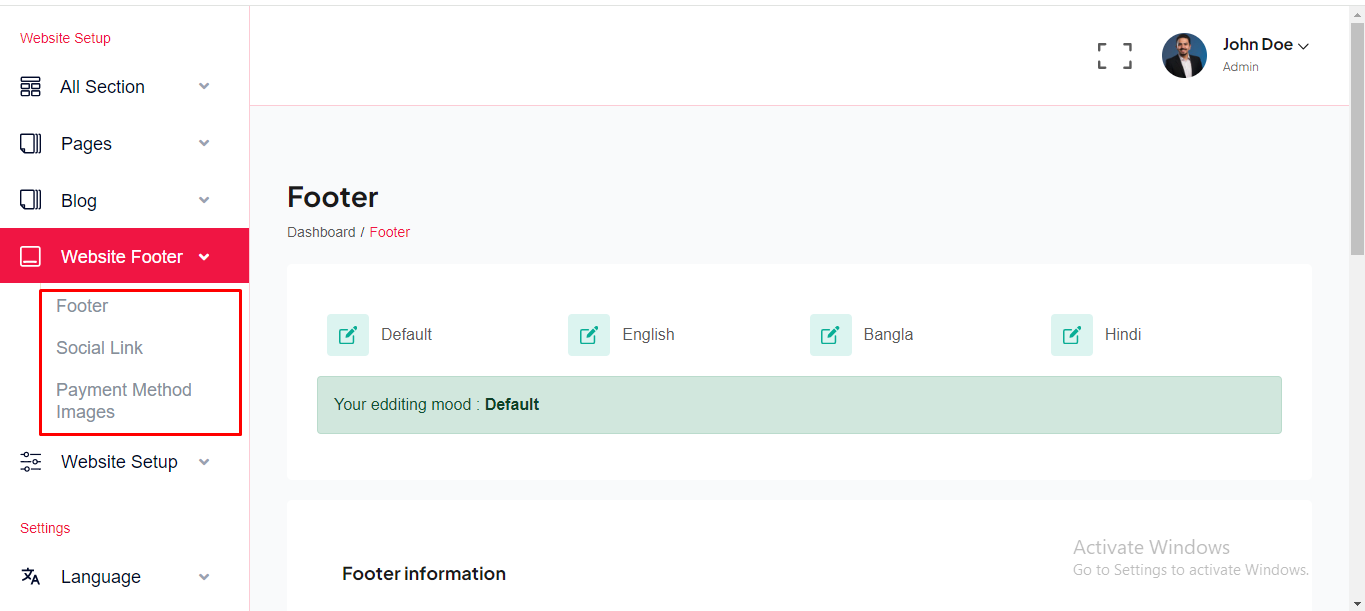
Website Footer information can be setup from here. Go to "Website Footer" from sidebar. See:
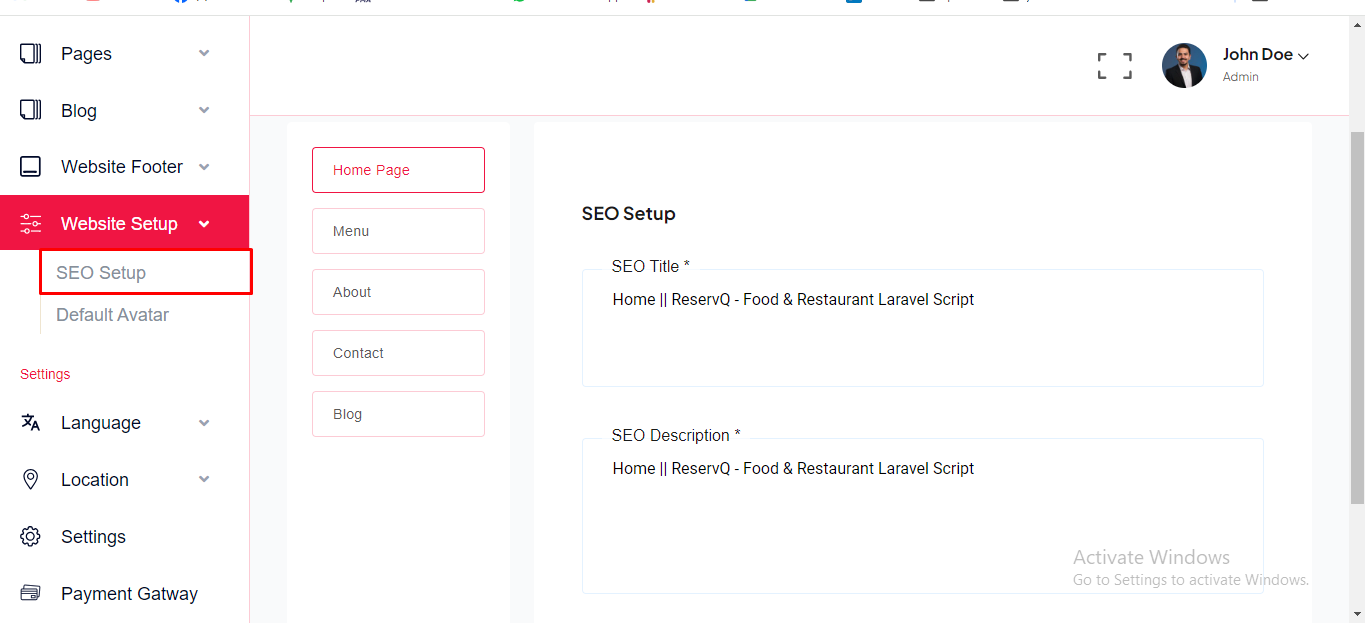
SEO Setup
SEO setting can be setup from the admin panel. Go to "Website Setup >> SEO setup" from sidebar. See:
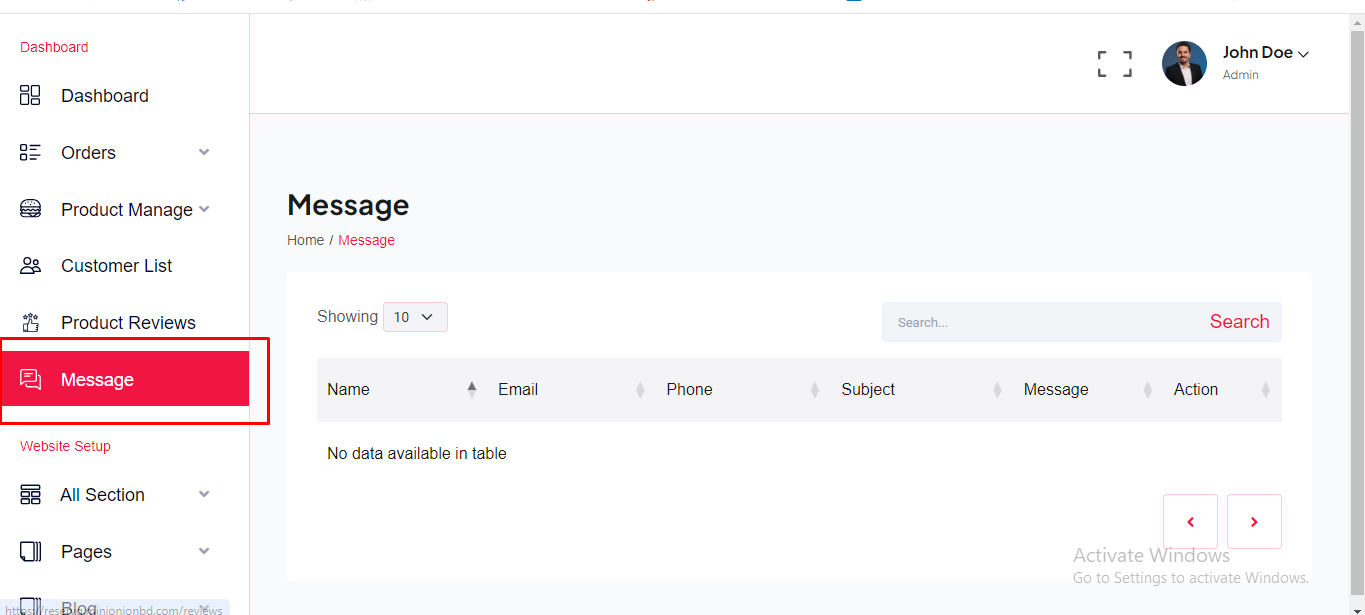
Contact Message
Contact Message can be manage from the admin panel. Go to "Message" from sidebar. See:
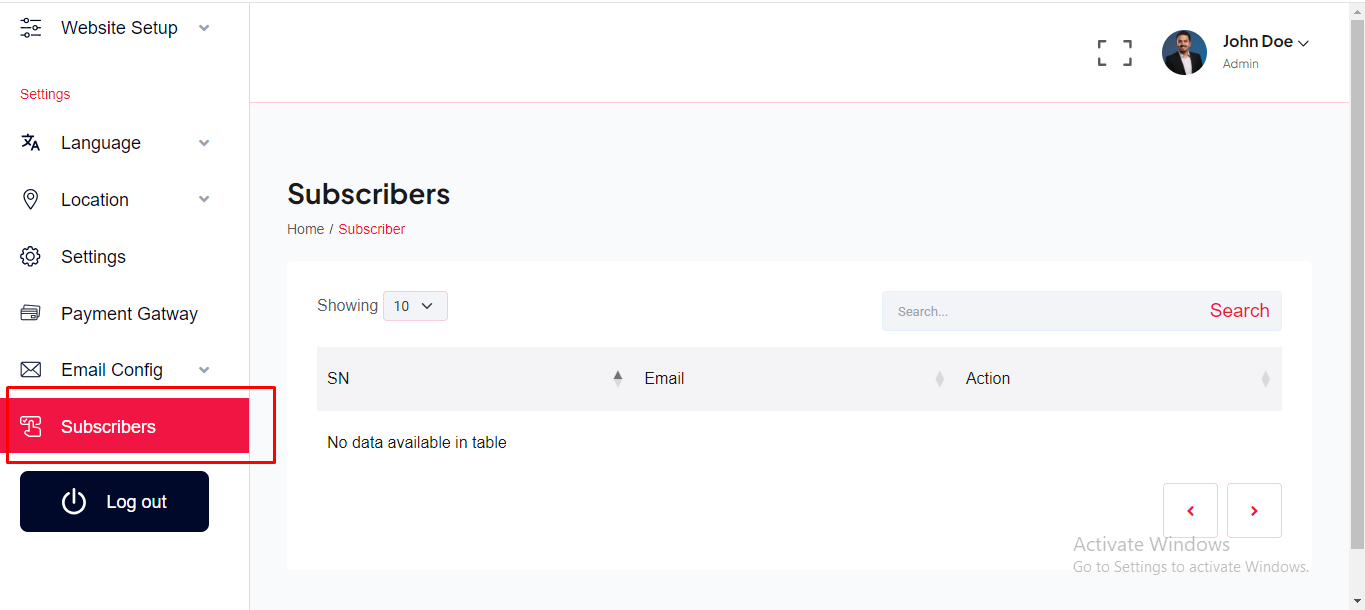
Subscriber
Subscription email can be manage from the admin panel. Go to "Subscribers".See:
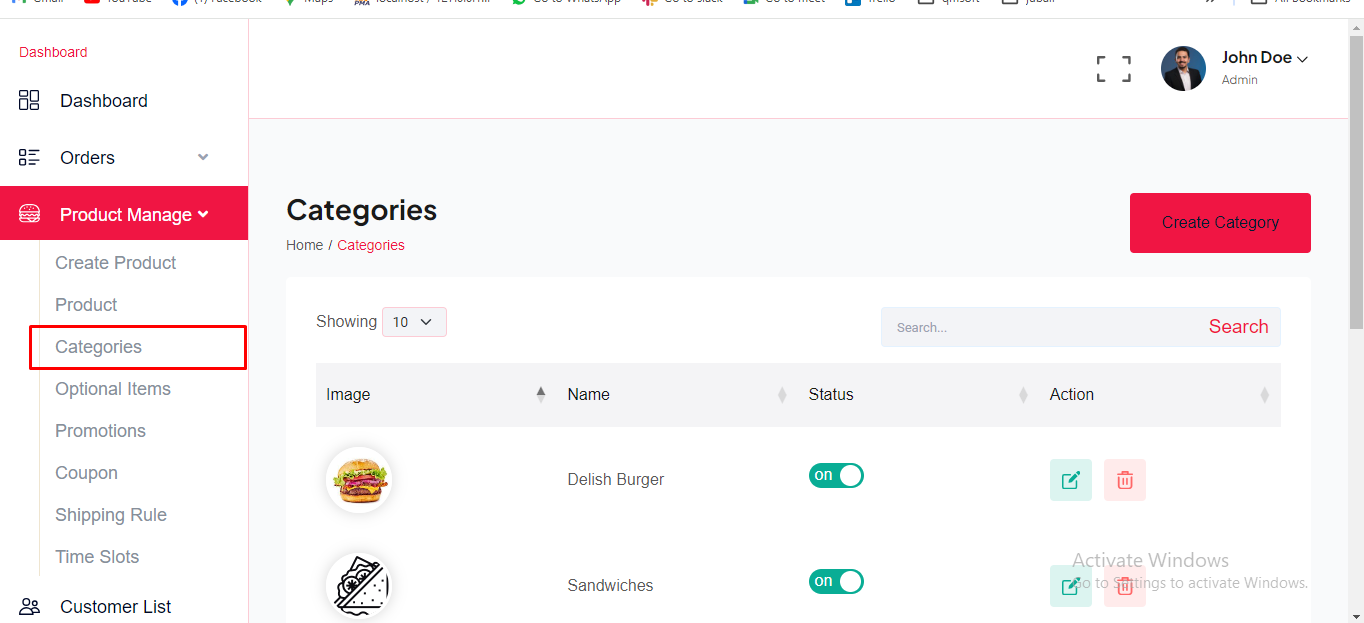
Product Category
Product Category can be manage from the admin panel. Go to "Manage Product >> Category". See:
Product
Product can be manage from the admin panel. Go to "Manage Product >> Product" from sidebar. See:

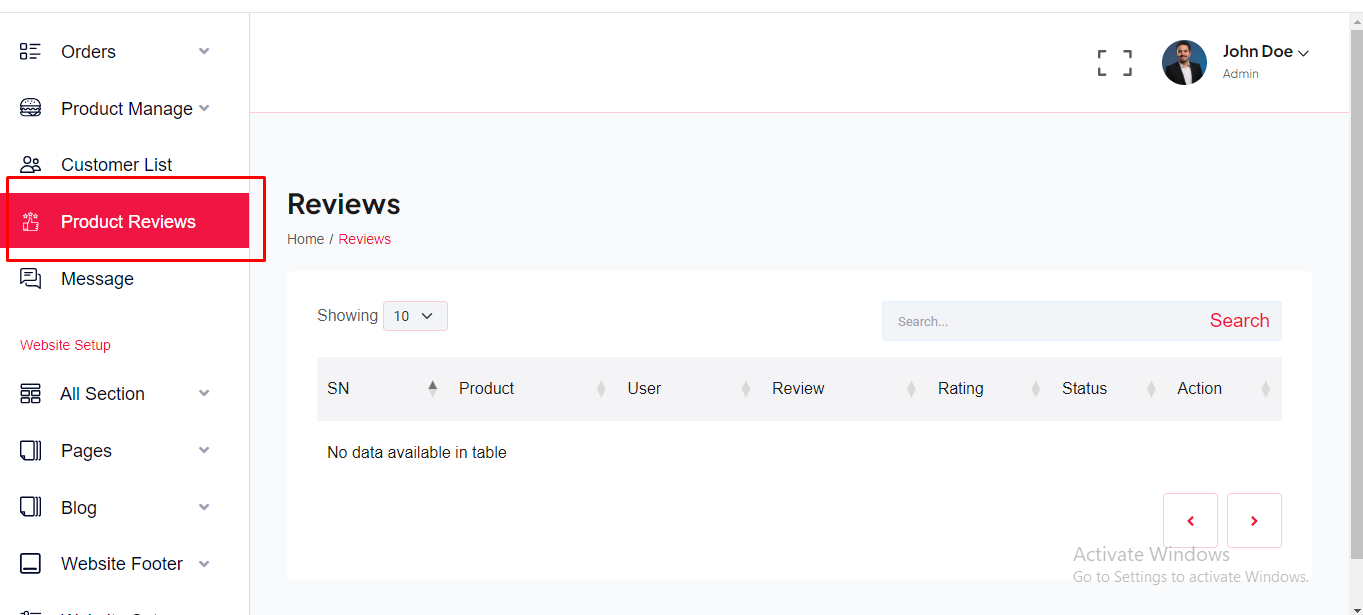
Product Review
Product Review can be manage from the admin panel. Go to "Product Review" from sidebar. See:
User / Client
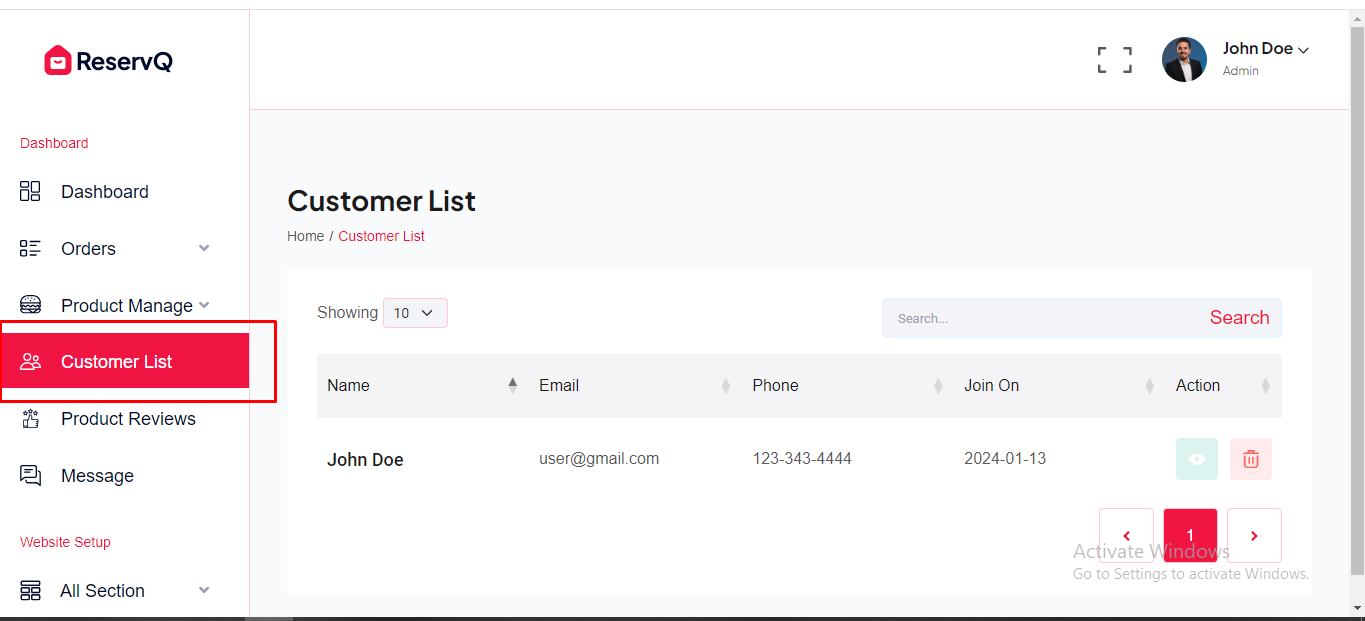
User can be manage from the admin panel. Go to "Manage Client >> Client List" from sidebar. See:
Default avatar
Default avatar can be manage from the admin panel. Go to "Website Setup >> Default Avatar" from sidebar. See:
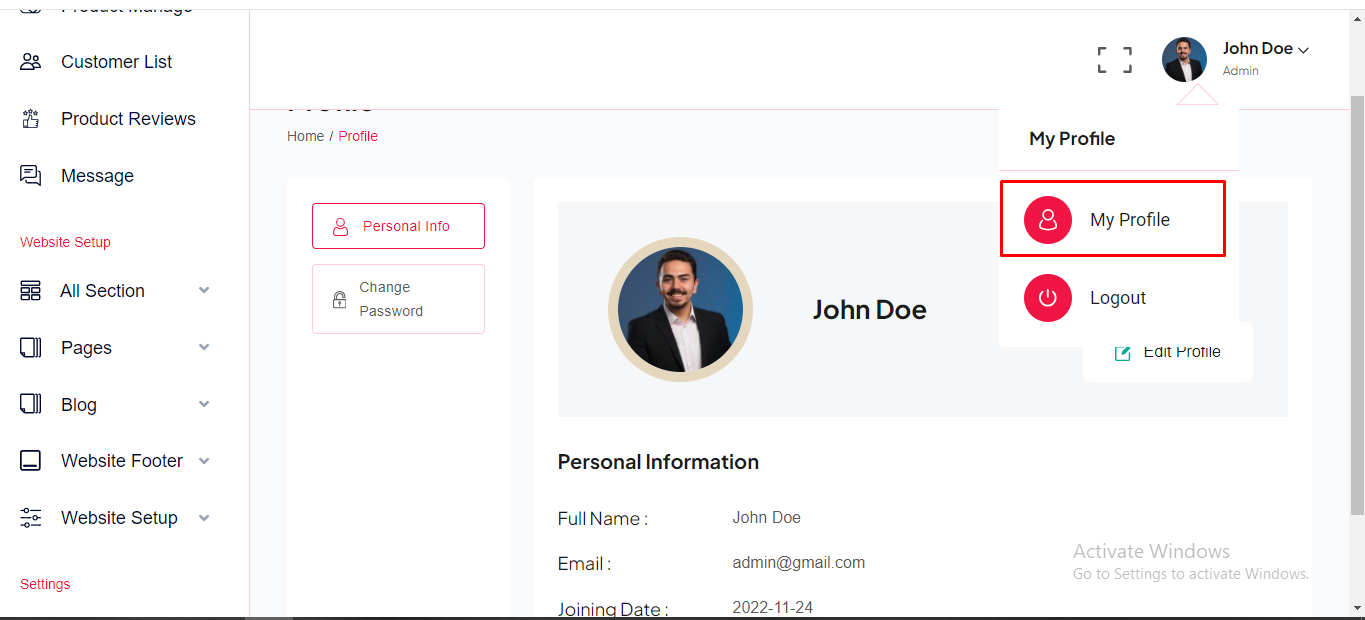
Admin Profile
Admin can change personal information and password from topbar. See:
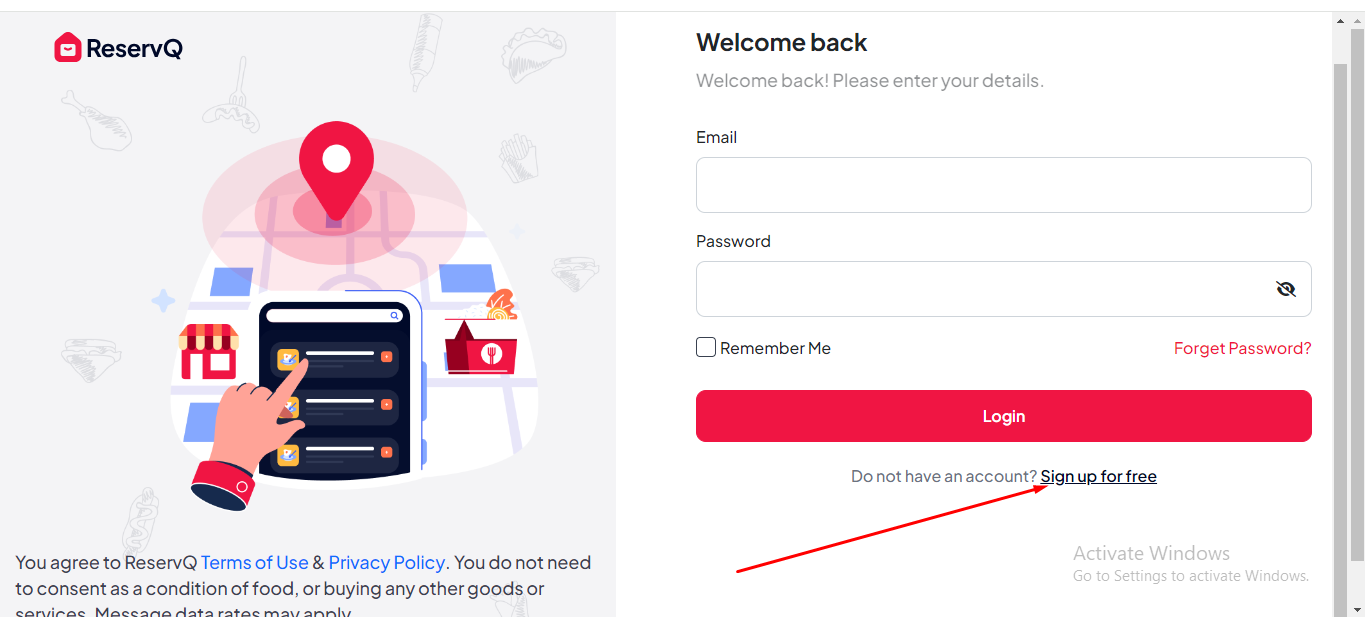
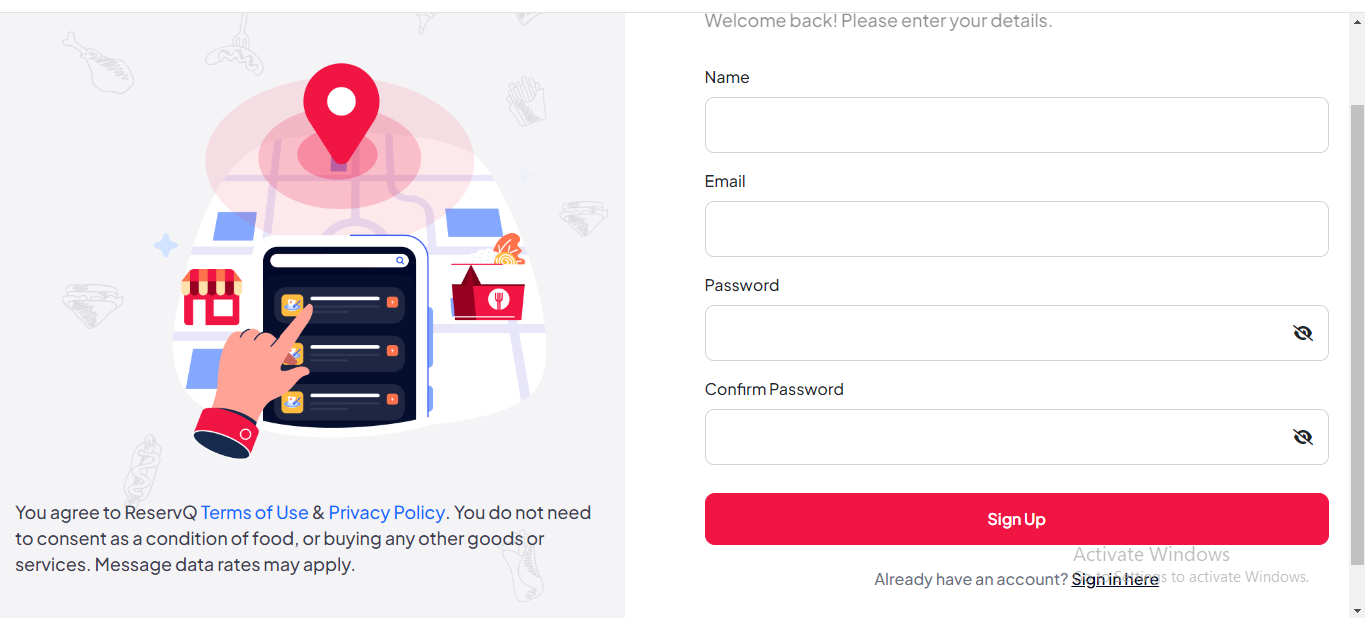
User Registration
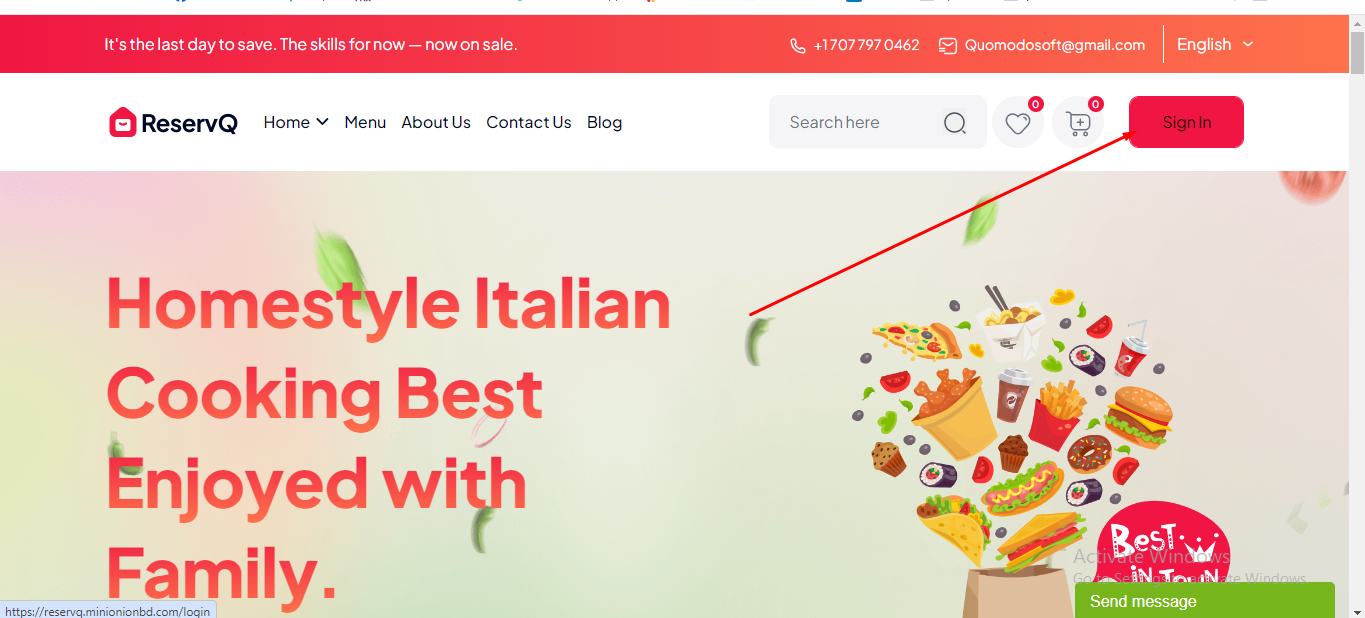
From the top menu, User can click on registration.
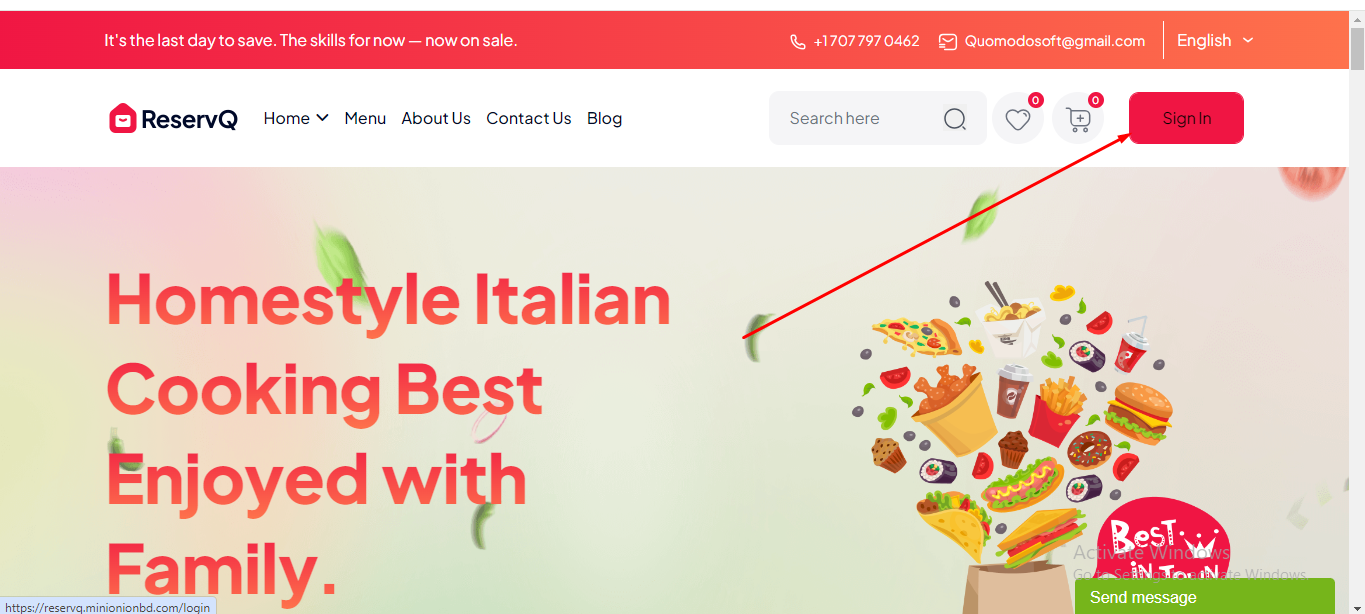
User Login
From the top menu, User can click on Login.
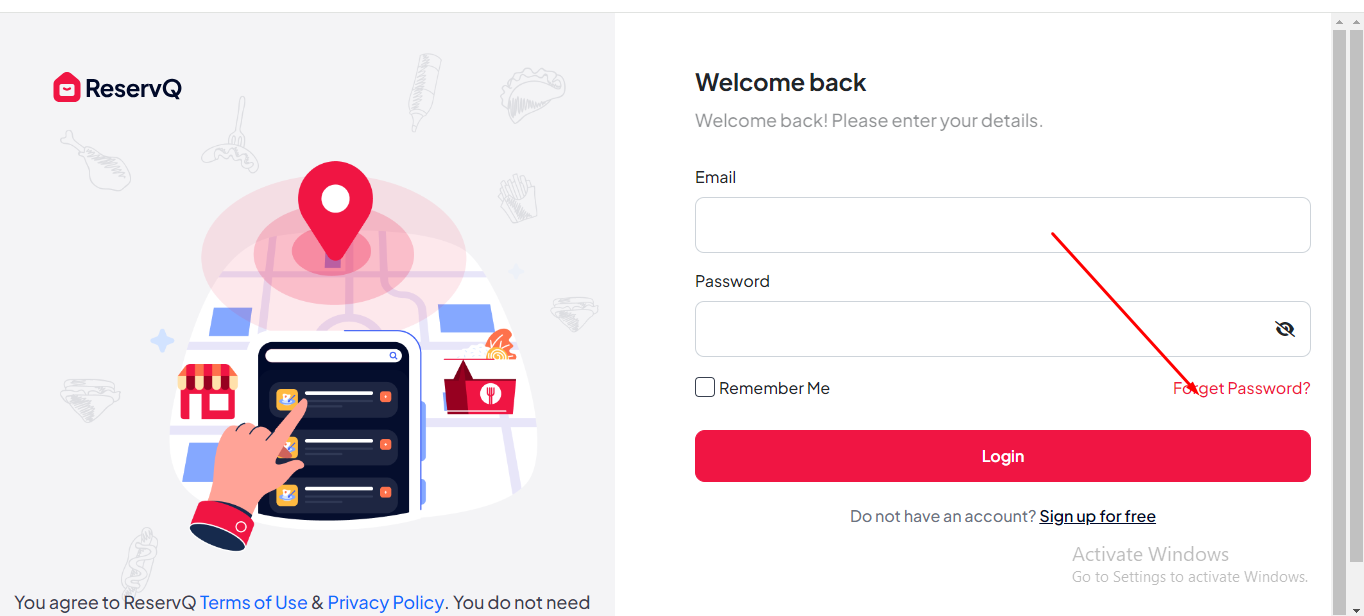
User Forget Password
In the login page, there is a link to reset the password if User forgets the existing password.
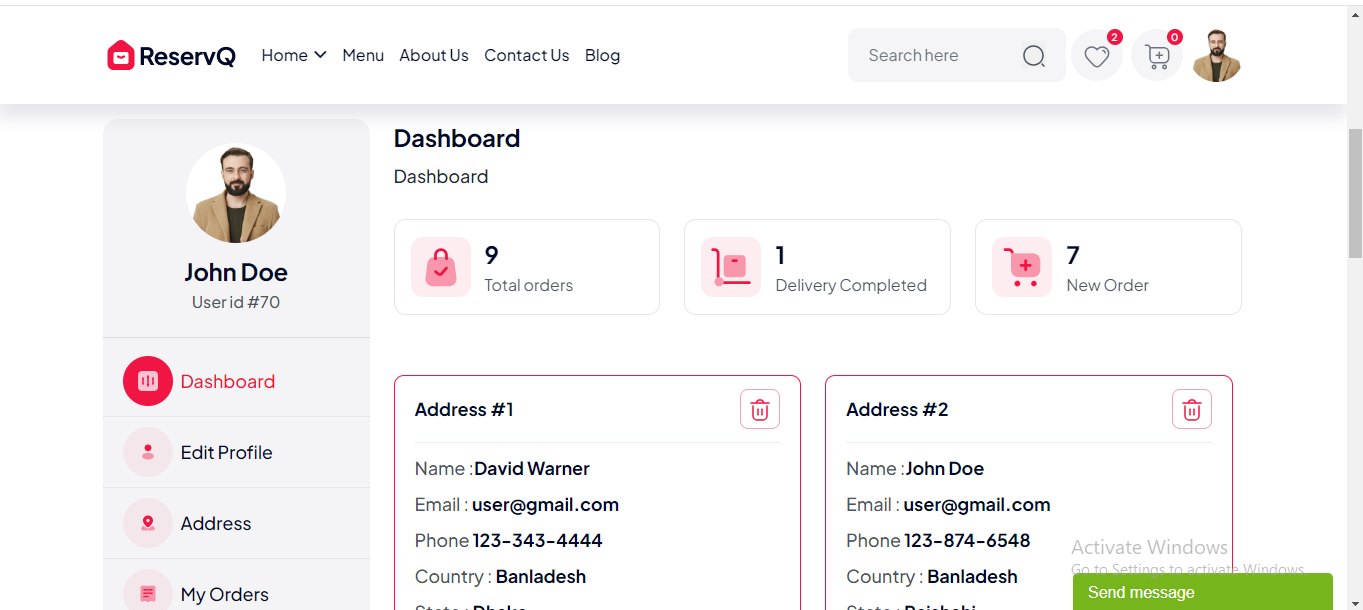
User Dashboard
After login, User will see his dashboard. See:
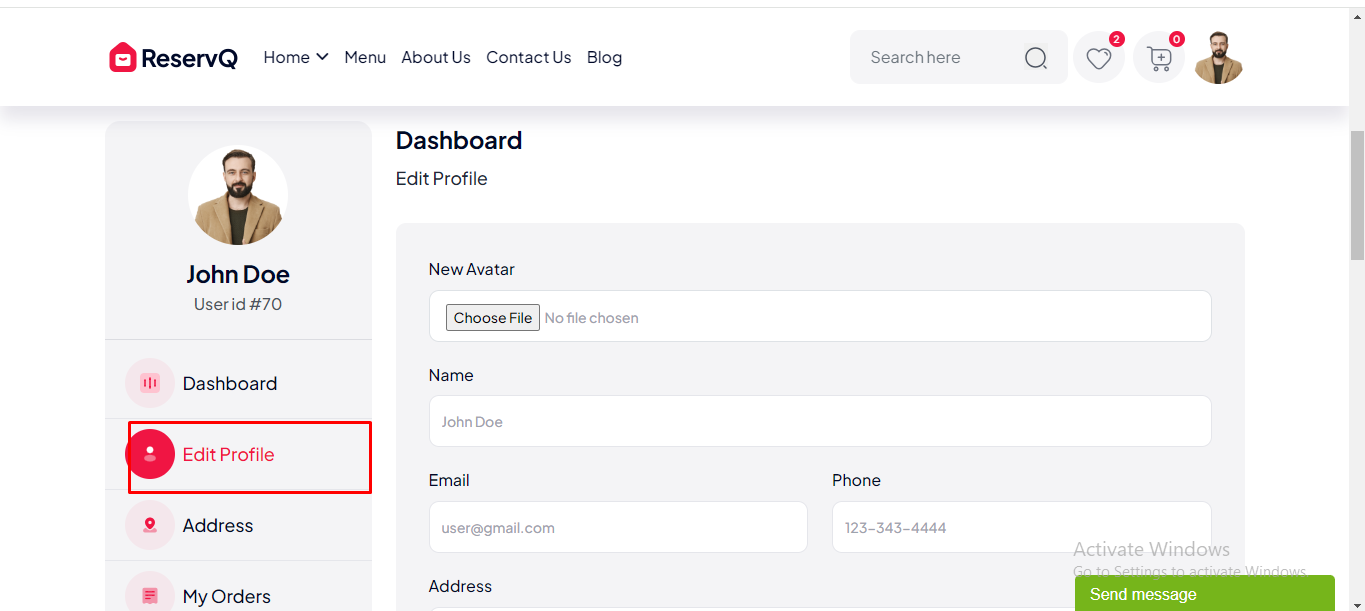
User Profile
User can edit his profile from click the edit button. See..
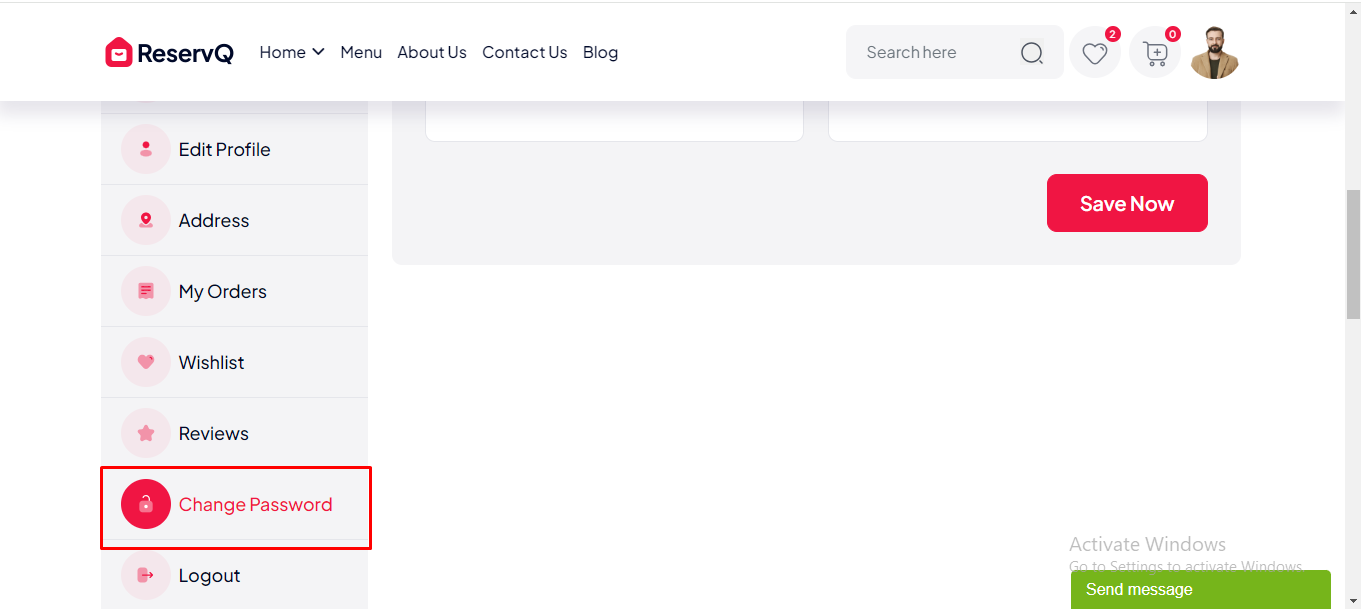
User password
User can edit his password from sidebar. See...
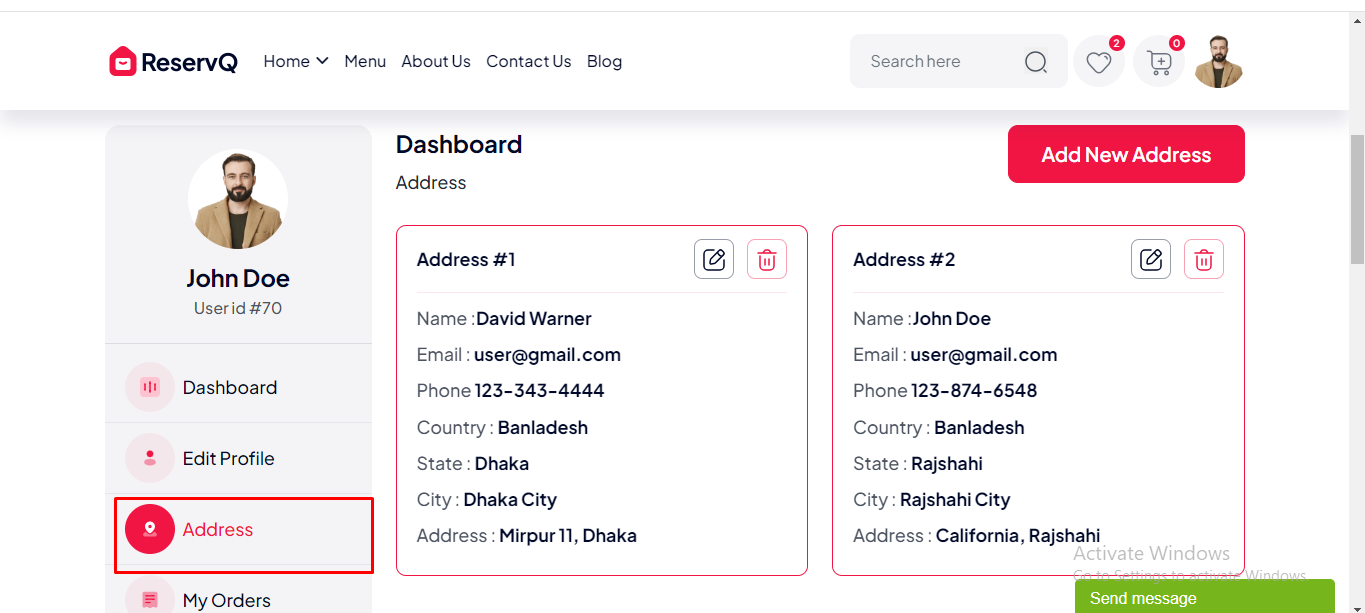
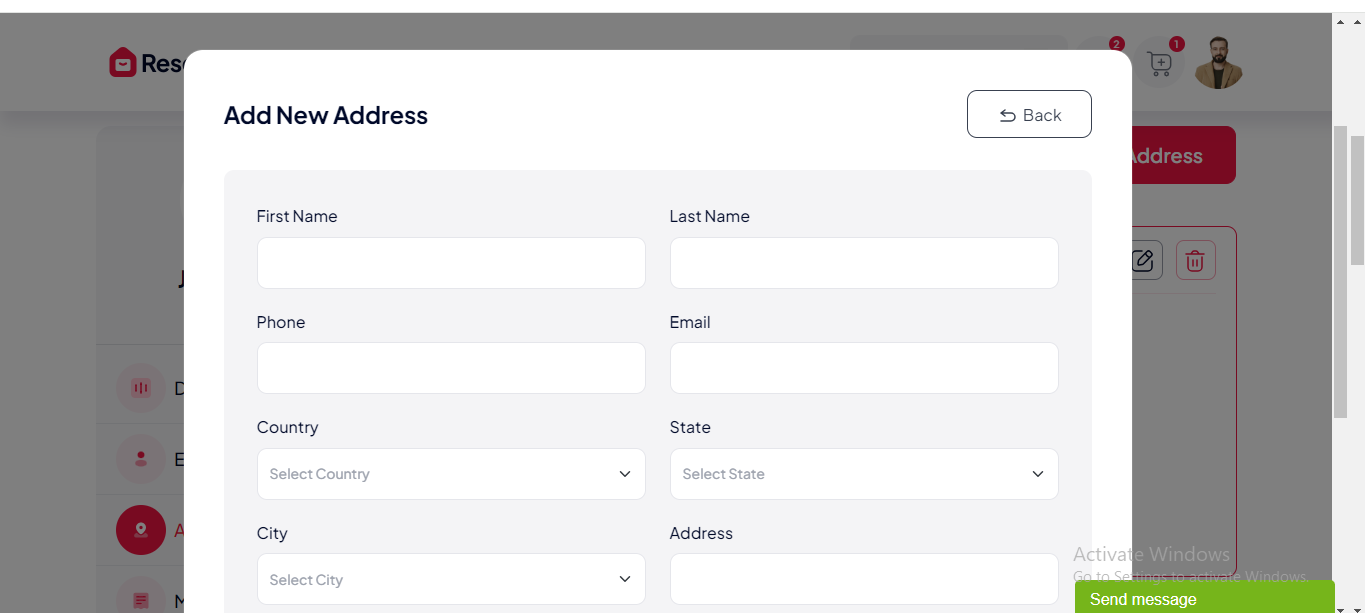
Address Book
User can unlimited address under this address book feature. See...
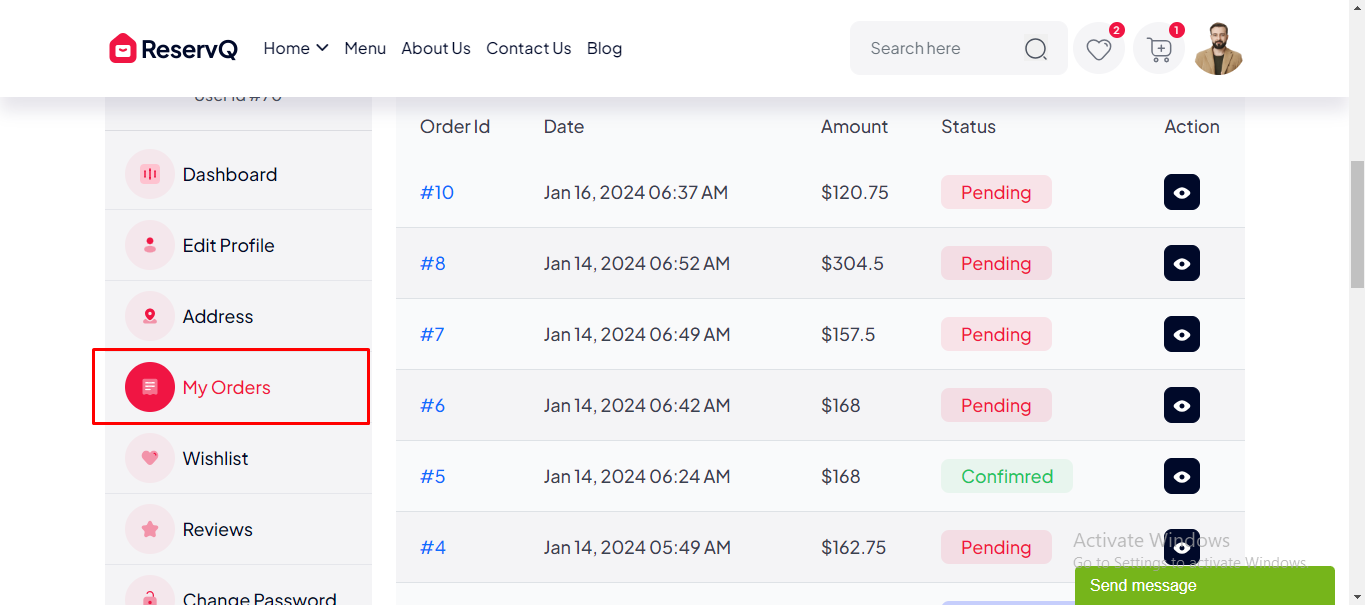
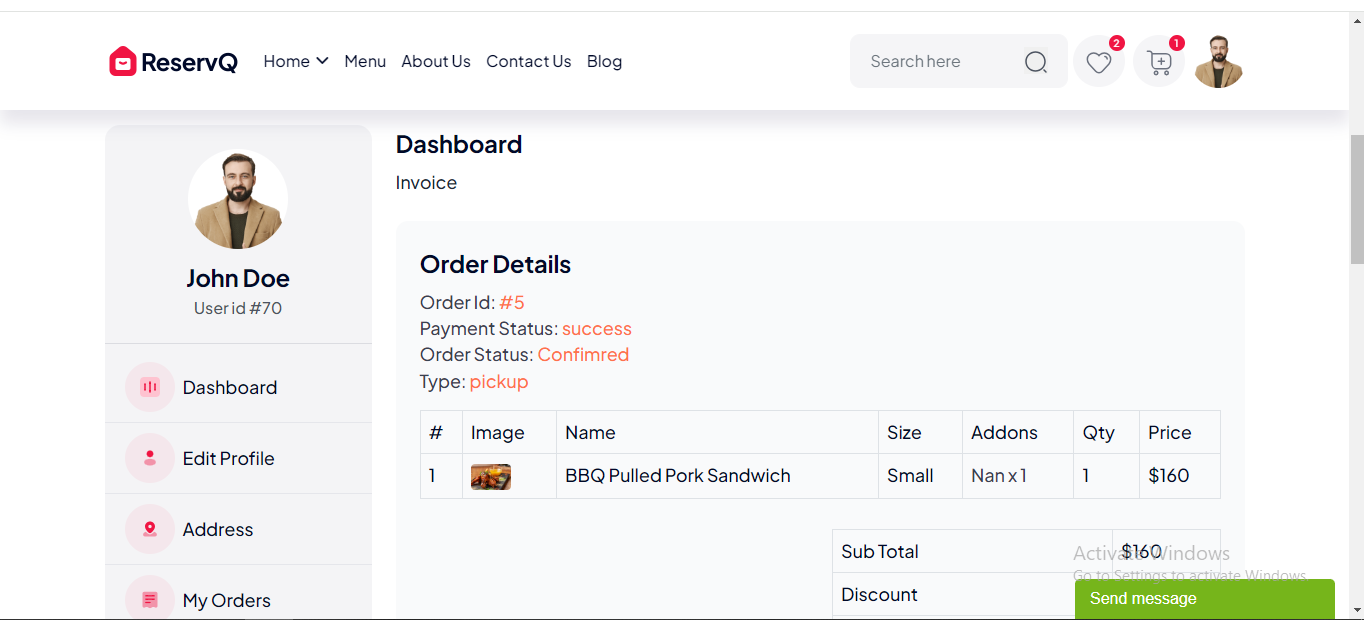
User Order
User can see all his order history as a list. He can also see booking detail by click the 'view' icon. See...
Support
If you need any help from us, you can contact via our support email:
abdur.rohman2003@gmail.com
Our support will reply within 24-48 hours.
Update Log History
Version 1.0
Initial Release
Demo
The default credentials of the script are:
Admin Login
Admin Dashboard
Login Email: admin@gmail.com
Login Password: 1234
User/Customer Login
User Profile
Login Email: user@gmail.com
Login Password: 1234


.jpg)